Written By: Don Dodi
Fact Checked By: Kristen Brown
Reviewed By: Diego Rosenberg
Simply, if your windshield has few invisible streaks then these kinds of things also increase the glare at the night and that make it harder to see the pedestrians and road signs perfectly.
So, you should be really focused to maintain your vehicle’s windshield neat & clean, as it is not only about having the car looks top-notch, but it literally connected to the road safety.
Even, thin streaks, oily haze or any leftover cleaner residue can be the villain that scatters light from the coming headlights and street lamps as well; that’s how it creates glare that strains your eyes and slows the reaction time as well.
It is seen that: inside the car, there’s a thin film often builds up on the windshield due to the gases released by the dashboard plastics over the period of time, dust particles and even fingerprints are responsible for this.
So, this is the guide that shows you How to Clean Car Windshield Without Streaks, so that you can learn practical steps and achieve crystal-clear results every time you perform this.
Understand, Why Do Car Windshields Get Streaks?
Streaks on car windshields aren’t usually caused by dirt alone.
In most cases, they’re caused by residual dirt, minerals, oil, or poor cleaning methods.
The glass may appear clean at first, but when sunlight, headlights, or rain hits the surface, hidden layers become visible.
Understanding the underlying causes of streaks helps you clean smarter than just wiping vigorously.
When you know what’s actually on the glass, you can choose the right solution and prevent the same problem from recurring.
1. Poor-quality glass cleaner residue
One of the most common causes of streaks is using poor-quality or overly concentrated glass cleaners.
Some cleaners contain soap, dyes, or extra additives that don’t dry completely.
When these products dry, they leave a thin film that’s visible in bright light.
If too much product is sprayed onto the glass, the liquid spreads and doesn’t dry properly, causing streaks and spots.
Rapid evaporation can also be a problem.
When the cleaner dries before it can be properly wiped off, it can cause streaks.
Good-quality automotive glass cleaners are designed to rinse cleanly without leaving any residue, specially on tinted windows.
To prevent streaks, it’s important to use the correct amount of product and polish with a dry, clean towel.
2. Hard Water Mineral Deposits
Hard water contains dissolved minerals like calcium and magnesium.
When water droplets dry on the windshield, these minerals are left behind, causing faint white or hazy spots.
Over time, repeated exposure to hard water from car washes, rain, or sprinkler systems can create a clear film.
These deposits aren’t easily removed with regular glass cleaners because they are mineral-based, not dirt-based.
In bright sunlight, mineral deposits scatter light and cause haziness.
In severe cases, mineral deposits can cause minor damage to the glass surface.
Using distilled water to quickly clean and dry the windshield after washing the car can significantly reduce this problem.
3. Oily Film and Off-Gassing from Dashboard Plastic
Many drivers are surprised to learn that most windshield haze comes from inside the car.
Modern dashboards and interior plastics gradually release small amounts of steam over time, specially in hot weather.
This natural process is called off-gassing.
The steam rises and condenses on the inside of the windshield, forming a thin, oily film.
Dust and fingerprints easily adhere to this film, further damaging it.
This film may not be visible during the day, but at night it causes intense glare from headlights.
Cleaning the inside glass with a regular alcohol-based solution removes this oily buildup and leaves it looking clean.
4. Leftover Wax or Car Washing Soap
During car washing or waxing, small amounts of soap or wax may accidentally spill onto the windshield.
If not thoroughly rinsed or wiped away, these products can leave slippery, hazy marks.
Wax, in particular, can cause stains that are difficult to see until it rains.
When water touches leftover wax, it spreads unevenly and creates distracting patterns on the glass.
Soap residue can react with minerals in the water, causing streaks.
Rinsing carefully and using a separate towel just for glass helps prevent cross-contamination with other car cleaning products.
5. Dirty or Low-Quality Microfiber Towels
Even the best cleaner can’t produce clean results if the towel is dirty.
Microfiber towels trap dirt, dust and old product residue within their fibers.
If reused without proper rinsing, they simply move the residue around instead of removing it.
Low-quality towels can also leave lint, which sticks to the glass and leaves more marks.
A wet or overly-filled towel spreads moisture instead of absorbing it, increasing streaks.
Using clean, high-quality microfiber towels and finally using a dry towel for buffing is the easiest way to achieve a streak-free finish.
6.Cleaning in Direct Sunlight
Cleaning the windshield in direct sunlight is one of the most common mistakes.
When the glass is hot, the cleaning solution evaporates too quickly.
This doesn’t allow enough time to wipe the surface evenly, leaving dry lines and spots.
The heat also causes the cleaner to dry out suddenly, leaving thick marks in some areas.
For best results, the windshield should be cool to the touch and cleaned in the shade or inside a garage.
Applying a little air helps ensure proper wiping and buffing, leaving the glass clean and smooth.
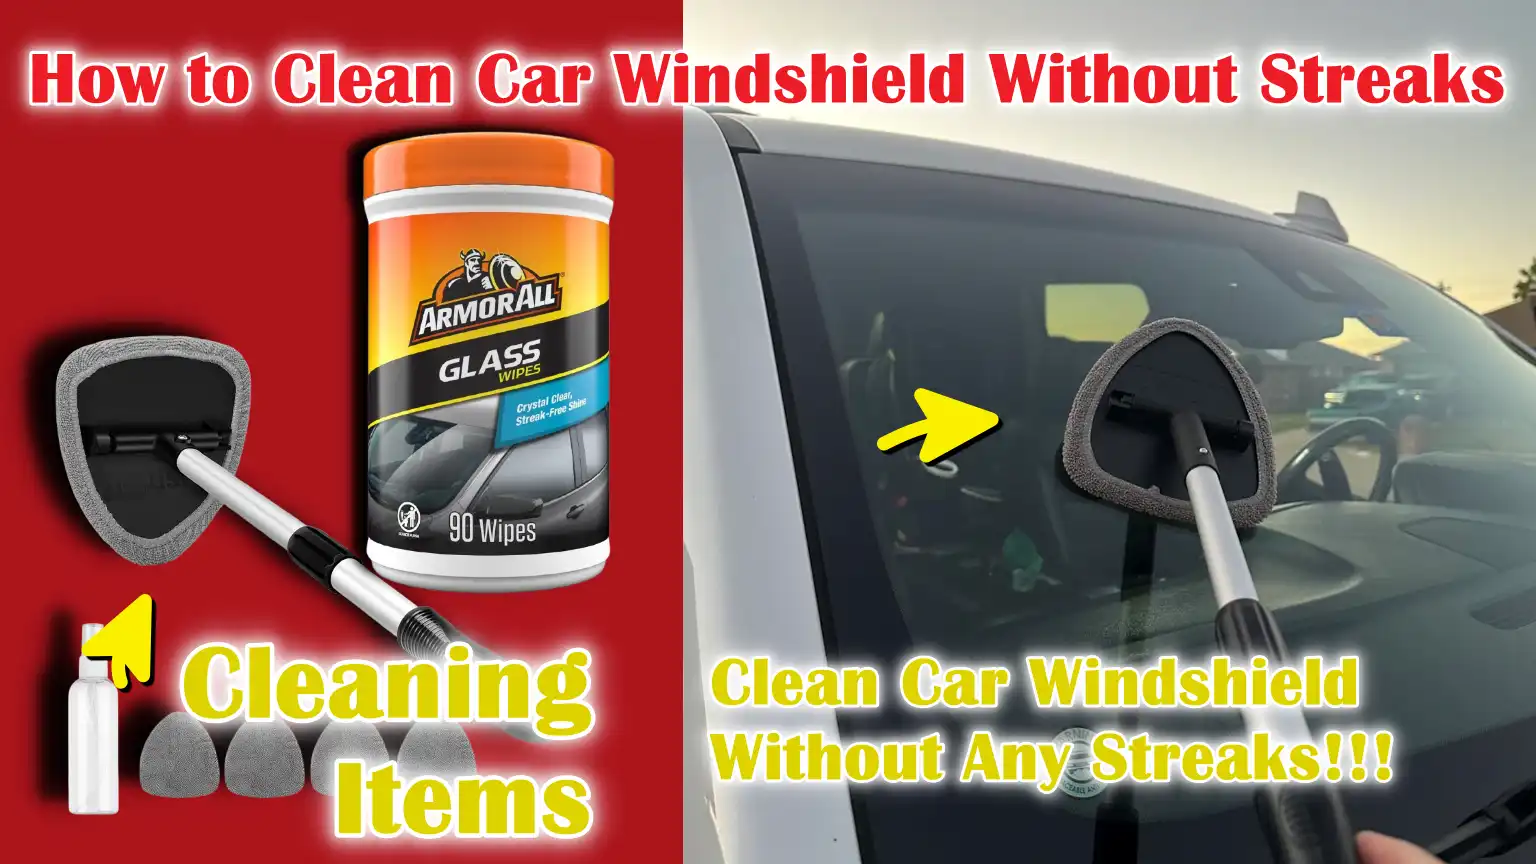
Tools
| Tool or Material | Why It Is Important |
|---|---|
| Automotive Glass Cleaner – Ammonia-Free | It removes dirt, grease and road film without damaging tinted windows. When used correctly, it dries quickly and leaves fewer marks. It’s safer for interior surfaces and the plastic trim around the windshield. |
| Distilled Water | It prevents white mineral stains caused by hard tap water. It’s great for mixing with alcohol for interior cleaning. It helps reduce marks because it leaves no mineral residue. |
| Clean Microfiber Towels – 2–3, Lint-Free, High GSM | It absorbs the cleaner and removes dirt without scratching the glass. A lint-free cloth prevents small fibers from sticking to the windshield. Using one towel for cleaning and one for drying results in a clean, streak-free finish. |
| Glass Cleaning Sponge or Applicator Pad | It helps loosen stuck-on dirt, insect marks and light grime. It spreads the cleaner evenly so you don’t overapply. This reduces the need for vigorous scrubbing, protecting the glass surface. |
| Isopropyl Alcohol | It removes the oily film formed by dashboard plastic and fingerprints. It evaporates quickly and leaves very little residue. When mixed with distilled water, it works well for cleaning the inside of the windshield. |
| Clay Bar – Optional | It removes stubborn dirt like tree sap stains, road tar and industrial waste. It smooths the glass surface before final cleaning. This is useful when normal washing doesn’t completely remove rough or stuck-on particles. |
| Rain-Repellent Treatment – Optional | It creates a water droplet effect, allowing rain to easily drain while driving. It improves visibility during heavy rain. It helps reduce future water marks and makes cleaning easier next time. |
How to Choose the Right Glass Cleaner
Choosing the right glass cleaner is one of the most important steps in preventing stains on your windshield.
Many stain problems aren’t caused by improper wiping, but rather by using the wrong product to begin with.
Car windshields are exposed to different conditions than home windows.
They’re exposed to road oil, exhaust pollution, tree sap mist, insect splashes and constant heat changes.
Inside the car, dashboard materials and trapped air can form an oily film on the glass.
For these reasons, automotive glass requires a cleaner that can remove grease, evaporate evenly and leave no stains.
Using products specifically formulated for cars helps protect tinted film, plastic trim and rubber seals, while also improving visibility and safety.
1. Difference Between Household and Automotive Glass Cleaners
Household glass cleaners are primarily designed for indoor windows and mirrors.
They focus on removing fingerprints and light dust, but they aren’t designed to handle heavy road grime or traffic film.
Many household products contain ammonia, strong fragrances, or additional additives that can leave marks on car windows.
In contrast, automotive glass cleaners are specifically formulated to remove oily deposits, insect marks and dirt without damaging the window tint or interior surfaces.
They generally rinse more thoroughly and are safer to use inside a vehicle.
Automotive cleaners are also tested for use on laminated safety glass, which is different from most household window glass.
Using cleaners designed for cars reduces the risk of streaking and surface damage.
2. Why Ammonia Can Damage Tinted Windows
Ammonia is a strong chemical that helps remove grease, but it can damage tinted windows over time.
Many modern cars have factory tint or aftermarket window film applied to the inside glass surface.
Ammonia can break down the adhesive layer holding the tint film in place.
This can cause bubbling, peeling, fading, or discoloration.
Over time, repeated exposure can weaken the film and shorten its lifespan.
Ammonia can also dry out the rubber seals and plastic trim around the windshield.
For this reason, most automotive experts recommend using ammonia-free cleaners for all glass in a car, even if the windshield is not tinted.
Using an ammonia-free formula protects both visibility and the contents inside.
3. Benefits of Alcohol-Based vs Vinegar-Based Cleaners
Alcohol-based cleaners are very effective for automotive glass because they dissolve oily films quickly and evaporate quickly.
Isopropyl alcohol is specially helpful in removing the thin haze that accumulates on the inside of the windshield, including the dashboard plastic.
Because it dries quickly, thorough wiping reduces the chance of streaks.
Vinegar-based cleaners are natural and good for removing light mineral deposits from hard water.
Vinegar can help break down calcium deposits, but it has a stronger odor and evaporates more slowly than alcohol.
Alcohol-based solutions are generally better for everyday cleaning and grease removal, while vinegar-based solutions can be useful for mineral spot treatment.
Choosing the right type depends on the specific problem you’re trying to address.
4. When to Use Specialized Automotive Glass Polish
Sometimes, regular glass cleaner isn’t enough.
If the windshield feels rough to the touch, has stubborn water spots, or shows fine wiper marks, a special automotive glass polish may be needed.
Glass polish contains very mild abrasives that gently remove stuck-on dirt and light surface stains.
It can smooth the glass and improve its ability to drip or roll.
This type of product is useful when mineral deposits build up over time or when old residue doesn’t respond to normal cleaning.
However, glass polish should be used with caution and only when necessary, as it is stronger than standard cleaners.
After polishing, the glass should be cleaned again to remove any remaining product and restore its full shine.
How to Clean a Car Windshield Without Streaks – Exterior
Properly cleaning the outside of your windshield doesn’t mean using too much product or scrubbing too hard.
It’s about controlling heat, safely removing loose dirt, using the correct wiping method and finishing with proper drying.
Automotive glass is strong laminated safety glass, but it can still develop fine scratches and streaks if cleaned carelessly.
Following each step carefully helps prevent glare, haze and light scattering while driving, which can reduce visibility.
Now, Let’s Park in the Right Place
Where you clean your windshield makes a big difference in the final result.
Heat directly affects how quickly glass cleaner evaporates.
When cleaner dries too quickly, it leaves marks and streaks that are difficult to remove.
1. Choose a Shade or Garage
Always park your car in a shaded area or garage before cleaning your windshield.
Direct sunlight heats the glass surface, sometimes making it hotter than the surrounding air.
When glass is hot, the cleaning solution evaporates too quickly, causing it to dry unevenly and streak.
The shade allows the cleaner to remain wet long enough to be wiped off properly.
This simple step alone can significantly improve your final cleaning result.
2. Ensure the glass is cool to the touch
Before you begin, gently place your hand on the windshield.
If it feels hot, wait until it cools.
Cleaning hot glass increases the risk of streaks because you can only wipe it evenly after the liquid has dried.
Cool glass provides better control over the cleaning process and helps the solution break down grease and dirt more effectively.
Now, Learn How to Remove Loose Dirt First
In fact, many streak problems begin when dust and dirt remain on the surface before wiping.
Dry wiping dusty glass can cause small scratches that trap the remaining dirt, making further cleaning difficult.
1. Wash with Water or a Pressure Washer
First, rinse the windshield with clean water.
You can use a hose or a pressure washer on a mild setting.
This removes loose dust, sand, pollen and small debris.
Road dust often contains small particles that can scratch the glass when rubbed with a towel.
Proper rinsing prepares the surface for safe cleaning.
2. Prevent Scratching While Wiping
When loose dirt is removed first, your microfiber towel glides easily over the glass.
This reduces friction and prevents small scratches.
Even though glass is strong, repeatedly dry-wiping away dirt can leave small marks that are visible in the sun.
Washing first protects both the glass and your cleaning tools.
How to Spray the Cleaner Properly
How you apply the cleaner determines how well it spreads and dries.
Too much liquid or too much spray often results in streaks.
1. Spray onto a towel instead of directly onto the glass
Spraying the cleaner directly onto a towel provides better control.
This prevents overspray from falling onto paint, dashboard edges, or rubber seals.
This also reduces drips and mess.
When cleaner is sprayed directly onto the glass, wind or gravity can cause it to spread evenly, which can cause streaks.
Applying it to a towel first provides a more uniform and controlled application.
2. Work in small sections
Clean one section of the windshield at a time instead of wiping the entire surface at once.
Working in small sections allows you to wipe the cleaner dry before it dries.
This method ensures that any remaining residue is completely removed and a completely clean finish is achieved.
It also helps you focus on stubborn stains without rushing.
How to Use the Correct Wiping Method
Wiping direction and pressure prevent streaks.
Light, controlled and even motions are essential.
1. Wipe straight first
Start by wiping the glass in straight lines.
This motion removes dirt and distributes the cleaner evenly across the surface.
Straight strokes help break up the road coat and effectively loosen any remaining stains.
Keeping your lines straight ensures even coverage.
2. Then wipe horizontally
After using long strokes, start wiping horizontally.
This cross-pattern method helps remove any remaining streaks from the first pass.
It also makes it easier to identify streaks later because the inside can be cleaned in the opposite direction.
The crossing pattern ensures better cleaning and complete coverage.
3. Use light, even pressure
Pressing too hard will result in poor cleaning and may spread any remaining stains evenly.
Light, even pressure allows the microfiber fibers to lift dirt without pushing it around.
Even pressure also prevents patchy drying and uneven shine.
How to Polish with a Dry Microfiber Towel
The final polishing is one of the most important steps in thoroughly cleaning your windshield.
Even a little moisture after drying can cause streaks.
1. Use a second clean towel
Always use a completely dry and clean microfiber towel for roughing.
Using a wet towel can cause moisture and residue to reapply.
A dry towel absorbs any remaining cleaner and removes light streaks that may not be visible at first.
2. Polish until crystal clear
Polish the surface slowly and with control.
Continue until the glass appears clean and smooth.
Proper polishing improves transparency and removes any slight haze that may remain after the first wipe.
3. View from different angles
Step aside and view the windshield from different angles.
Light reflections often reveal hidden streaks that are not directly visible.
Checking in natural light before finishing the job ensures the glass is completely clean.
Taking more time to inspect ensures better visibility and safer driving conditions.
How to Clean the Inside of a Windshield Without Leaving Marks
Cleaning the inside of a windshield is often more difficult than the outside, due to limited space, obstructions in the dashboard and a thin, oily layer that builds up over time.
Inside fog is primarily caused by dust, fingerprints and a process called off-gassing, in which tiny vapors slowly emanate from the dashboard’s plastic, specially in hot weather.
These vapors rise and condense on the glass, forming a thin but sticky layer that attracts even more dirt.
This layer may not be visible during the day, but at night it creates intense glare from headlights and streetlights.
A properly cleaned inside windshield appears clearer, reduces eye strain and makes driving in low light and rain safer.
How to Protect the Dashboard
Before beginning the cleaning process, it’s important to protect the dashboard and electronic panels.
Interior cleaners, specially alcohol-based solutions, can drip and leave marks on plastic surfaces if not properly controlled.
1. Place a towel on the dashboard to catch drips
Lay a clean, dry towel on the dashboard near the windshield base.
This simple step prevents cleaner from dripping onto air vents, buttons, or the display screen.
Liquid trapped inside vents can cause odors or minor damage over time.
Preventing drips also keeps the dashboard looking clean and prevents the need for extensive wiping later.
Protecting surrounding surfaces allows you to focus on cleaning the glass without worry.
How to Remove the Inside Film
The haze on the inside of the windshield is usually oily, not dusty.
Regular glass cleaner may not remove this film completely, so a stronger, yet safer, solution works best.
1. Use an Isopropyl Alcohol Mix – 70% Alcohol + Distilled Water
A mixture of 70% isopropyl alcohol and distilled water is very effective for cleaning interior glass.
The alcohol quickly breaks down grease and oily deposits and the distilled water prevents mineral stains.
The alcohol also evaporates quickly, reducing streaks after a thorough wipe.
Using distilled water instead of tap water ensures no calcium or magnesium deposits remain.
To maintain control and prevent drips, lightly spray the solution onto a microfiber towel instead of spraying it directly onto the glass.
2. Watch for Oily Smudges
Pay special attention to the center area directly in front of the driver, as this area often has the most smudges.
Wipe slowly and in controlled movements to remove the thin oily film.
You’ll notice the towel turning slightly gray, indicating the film is being removed.
If the glass still appears hazy in the light, repeat this process with a clean section of the towel until the surface appears smooth and clean.
How to Use Correct Hand Position
Because the windshield slopes forward and has limited space, hand position is crucial for proper cleaning.
Using the correct angle reduces strain and improves access.
1. Use the Back-of-Hand Technique for Tight Corners
When reaching the lower corners near the dashboard, hold the microfiber towel with the back of your hand facing the glass.
This position allows your fingers to reach the cloth in tight spaces without awkwardly bending your wrist.
Tight corners often tend to accumulate more dust and residual dirt, so focusing on these areas will ensure a thorough cleaning of the entire surface.
2. Use Horizontal Strokes on the Inside – As Opposed to the Outside to Detect Streaks
When cleaning the inside windshield, if the outside was cleaned vertically, wipe in horizontal lines.
This cross-direction method makes it easier to identify where the streaks are coming from.
If you see a vertical streak, you know it’s on the outside.
If you see a horizontal streak, it’s on the inside.
This simple method saves time and prevents confusion when checking your final results.
Do Final Inspection
Inspection is an important step that many people skip.
Even small remaining streaks can be very visible when driving at night.
1. Sit in the Driver’s Seat
After cleaning, sit in a normal driving position.
This gives you the same viewing angle as on the road.
Check the windshield in different places to see if there are any spots or stains that weren’t visible when the car was parked outside.
2. Check in the Sun or with a Flashlight
If possible, check the glass at an angle in the sun or with a flashlight.
The reflection of light makes hidden streaks easier to see.
If you notice any marks, gently wipe the area with a clean, dry microfiber towel.
Taking a few more minutes to carefully inspect will provide greater clarity and improved visibility in all driving conditions.
Now, Learn Pro Techniques for a Completely Streak-Free Finish
Getting a completely streak-free windshield often requires a few simple professional techniques rather than a lot of work.
Many detailing experts agree that clarity is achieved by controlling moisture, preventing residue transfer and using a clean wiping surface at every stage.
Even high-quality cleaners can leave faint marks if the towel is too full or if minerals from tap water remain.
Glass is smooth, but stains are easily visible because light reflects strongly off its surface.
When light falls on remaining moisture or residue, it diffuses and creates a glare.
Using the correct finishing method ensures the surface is dry, clean and free of hidden streak lines.
1. Use the “Two-Towel Method”
The two-towel method is highly recommended in professional car detailing because it separates cleaning from drying.
First, a microfiber towel is used to evenly apply and spread the cleaner onto the glass.
This towel removes dirt, grease and road film from the surface.
However, even after this step, some moisture or thin residue may remain on the glass.
A second towel, which should be completely dry and clean, is used to quickly polish the surface.
This second pass absorbs any remaining cleaner and removes light streaks before it dries.
Separating these steps reduces the risk of spreading moisture and helps achieve a clean, polished finish.
2. Fold a microfiber cloth into quarters for multiple surfaces
Folding a microfiber cloth into four equal sections creates multiple surfaces to wipe with one cloth.
Each side can be used separately before moving on to a clean area.
This method prevents dirt and residue from spreading back onto the glass.
When a particular area becomes slightly wet or dirty, simply fold the towel again to achieve a clean surface.
Microfiber fibers are designed to trap particles within their weave, but once wet, they lose this ability.
Properly folding them ensures better absorption and consistent performance throughout the cleaning process.
3. Change towels when wet
Wet towels do not absorb moisture properly.
When microfiber becomes too wet, it begins to push liquid around instead of lifting it.
This often results in streaks on the glass after it dries.
Replacing the first towel as soon as it becomes wet or using a dry towel is essential for streak-free results.
Professionals often keep several clean towels on hand to maintain dryness throughout the process.
Keeping the towel clean and completely dry ensures that the glass is polished rather than stained.
4. Use only distilled water
Distilled water does not contain dissolved minerals such as calcium or magnesium.
In many cases, tap water contains minerals that are left behind when the water evaporates.
These remaining minerals create white spots or hazy marks that are difficult to remove.
When mixing cleaning solutions or lightly rinsing glass, distilled water completely prevents this problem.
It leaves no residue after drying, making it ideal for final wiping or alcohol mixtures.
Using distilled water is a simple yet very effective way to prevent mineral streaks.
5. Finish with Newspaper: Traditional Method – Optional
Some traditional cleaning methods recommend finishing with newspaper.
Newspaper is dense and low in lint, making it effective in polishing glass.
The paper’s light texture can help remove light stains without scratching the surface.
However, modern microfiber towels often produce similar or better results without leaving ink marks.
If using newspaper, it should be clean and dry and should only be used as a final buffing step after thoroughly rinsing it.
Although optional, this method has been used for decades and, when done carefully, can result in a clean finish.
How to Remove Stubborn Dirt from a Windshield
Regular cleaning removes light dust and normal road grime, but some dirt sticks firmly to the glass surface and requires special treatment.
Windshield glass is very strong, but it’s not completely damage-proof.
Things like tree sap, insect debris, mineral deposits and worn wiper marks can stick tightly and create haze or rough patches.
This dirt not only looks unsightly, but it also scatters light and reduces visibility, specially at night and during rain.
Safely removing it requires patience, the right cleaning agent and gentle methods to avoid scratching the glass.
1. How to Remove Tree Sap
Tree sap is sticky and resin-based, which means that normal glass cleaners usually don’t dissolve it completely.
When the sap hardens in the sun, it firmly adheres to the glass surface.
To remove it safely, first soften the sap by placing a clean cloth soaked in warm water on the area for a few minutes.
This helps loosen the hardened layer.
Once softened, dab a little isopropyl alcohol on a microfiber towel and gently rub the area.
The alcohol helps break down the sticky resin without damaging the glass.
Avoid using sharp objects to remove the sap, as this could scratch the windshield.
If any residue remains, a clay bar designed for automotive use can gently remove the remaining particles without damaging the surface.
2. Removing Insect Pieces
Insect Pieces are more difficult than they appear because they contain protein and acid.
When left on the windshield, specially in hot weather, these residues can harden and become difficult to remove.
Over time, the acid can leave light stains or marks on the glass surface.
To remove insect splatters, soak the area in water or a special insect repellent solution and leave it for a few minutes.
This will soften the dry area.
Then, gently wipe with a microfiber towel or glass-safe sponge.
Avoid rubbing too hard, as dried insect particles may be rubbed off.
Cleaning insect splatters quickly after driving makes them much easier to remove and prevents lasting stains on the glass.
3. Removing Hard Water Stains with a Vinegar Solution
Hard water stains are caused by minerals like calcium and magnesium that are left behind when water evaporates.
If not removed promptly, these white or hazy stains can become stubborn.
An easy and effective method is to use a mixture of equal parts white vinegar and distilled water.
Vinegar contains mild acetic acid, which helps dissolve mineral deposits.
Apply this solution to the affected area and leave it for a few minutes, then wipe it away with a clean microfiber towel.
Rinse with distilled water to prevent new mineral stains.
In severe cases, repeated treatments may be necessary.
The best long-term solution is to prevent water spots by drying the windshield quickly after washing.
4. Removing Wiper Blade Marks
Wiper blade marks often appear as curved streaks that follow the path of the blades.
These marks are usually caused by worn rubber, dirt stuck to the blade edge, or particles embedded in the glass.
First, thoroughly clean the windshield to remove loose dirt.
Then, lift the wiper arms and wipe the rubber blades with a cloth dampened with alcohol.
This removes any remaining dirt and old rubber.
If marks remain, the blades are worn and need to be replaced.
Using clean and well-maintained wiper blades prevents further marks and protects the windshield surface.
5. Using Glass Polish for Marks
Some stains and stains may not remain on the surface, but may leave light marks on the glass over time.
This may be due to prolonged exposure to hard water or repeated rubbing with wipers.
In such cases, regular cleaners may not fully restore the shine.
A specialized automotive glass polish can help remove very fine surface imperfections.
Glass polish contains mild abrasives that gently smooth the surface and reduce marks.
It should be applied carefully and according to the product instructions, using light pressure and in small areas.
After polishing, clean the glass again to remove the marks.
Glass polish should only be used when necessary, as it removes a very thin layer of material.
How Often Should You Clean Your Windshield?
Cleaning your windshield regularly isn’t just about keeping your car looking clean, it’s also about maintaining clear and safe visibility.
Over time, dust, pollution, road grime, insect debris and debris gradually accumulate on the glass.
Even if the windshield appears clean at first glance, a thin, invisible layer may already be forming on it.
This layer becomes visible when sunlight, headlights, or rain shines on the surface.
Regular cleaning prevents stubborn buildup and makes it easier to remove.
It also improves wiper performance, reduces glare and helps you see road markings, pedestrians and lane markings more clearly.
The correct cleaning frequency depends on how often you drive, the weather in your area and the environment around your vehicle.
1. Daily Commuters vs Occasional Drivers
Drivers who use their vehicles daily are exposed to more road grime.
Daily commuters face traffic pollution, construction dust, exhaust particles and changing weather.
These substances accumulate on the windshield and quickly form a thin film.
For daily drivers, a light cleaning of the exterior once or twice a week and a thorough cleaning of the interior at least once every two weeks to remove oil stains is recommended.
In contrast, those who drive occasionally and use their cars only a few times a week may not need to clean as frequently.
However, even parked vehicles can accumulate dust, pollen and environmental debris.
For occasional drivers, cleaning the windshield every two to three weeks is usually sufficient, unless significant dirt is visible.
No matter how often you drive, it’s always beneficial to clean your windshield immediately if you notice any stains or glare.
2. How Often to Clean According to the Season
Weather also plays a major role in how quickly your windshield gets dirty.
In summer, higher temperatures increase the amount of smoke emitted from the dashboard, leading to fogging inside.
In winter, road salt spray and moisture can create a hazy layer on the outside glass.
Spring often brings pollen, which easily adheres to slightly damp glass surfaces.
In autumn, leaves, tree sap and moisture can increase fogging.
Due to these seasonal factors, windshield cleaning may be required more frequently during bad weather months.
In summer or winter, when road salt is present, checking your windshield weekly can help maintain a clear view.
Adjusting your cleaning schedule to suit the season helps maintain glass cleanliness for the long term.
3. After Rain, Pollen Season, or Dusty Areas
Rainwater may appear clear, but it often contains pollutants and airborne particles.
When rain dries on the windshield, it can leave mineral marks and light stains.
Cleaning the windshield after heavy rain, specially if the vehicle has been exposed to dirty water or sprinkler water, prevents water spots from forming.
During pollen season, fine yellow or green particles quickly settle on vehicles and combine with moisture to form a sticky layer.
Dust storms or construction areas can also leave a layer of fine abrasive particles on the windshield.
In these situations, rinsing and cleaning the windshield immediately after exposure prevents dirt from accumulating on the surface.
Prompt cleaning after exposure to external substances keeps the windshield smooth, reduces stains and promotes safe driving in all conditions.
What are the Mistakes When Cleaning Your Car Windshield

Cleaning car windows may seem easy, but small mistakes can lead to streaks, haziness, scratches and reduced visibility.
Windshield glass reflects light strongly, meaning even small specks or lint can be easily visible in sunlight or headlights.
Many people believe they’ve cleaned their windows properly, but mistakes in timing, tools, or technique often lead to new problems.
Understanding what not to do is just as important as knowing the correct cleaning steps.
Avoiding these common mistakes will help you achieve clean windows, reduce glare and maintain safe driving conditions.
1. Cleaning in the Direct Sunlight
Cleaning a windshield in direct sunlight is one of the most common causes of streaks.
When the glass is heated by sunlight, its surface temperature increases rapidly.
Glass cleaner sprayed on hot glass evaporates very quickly, sometimes even preventing proper wiping.
This fast-drying property leaves uneven marks and visible streaks.
Heat causes the cleaning liquid to pool in certain areas, leading to hazy spots.
For best results, the glass should be cool to the touch.
Cleaning in the shade or inside a garage keeps the cleaner wet long enough to fully break down grease and dirt.
One of the easiest ways to prevent marks is to control the temperature.
2. Using Paper Towels – Lint Problem
Paper towels may seem convenient, but they’re not ideal for car glass.
Most paper towels leave behind tiny fibers called lint.
These fibers stick to the glass and become visible in sunlight.
The texture of paper towels is rougher than that of microfiber cloths.
When used on dusty glass, they can attract small particles to the surface, increasing the risk of minor scratches.
Furthermore, paper towels absorb less liquid than microfiber, meaning they spread cleaner rather than removing it.
Using a lint-free microfiber towel provides better absorption, easier wiping and a clean finish.
3. Using a Dirty Microfiber Cloth
Microfiber cloths are designed to trap dirt within their fibers.
However, once they become dirty or clogged with dirt, their effectiveness is diminished.
Dirty cloths spread old cleaner, grease and dust back onto the glass instead of removing it.
This often results in circular streaks after drying.
It’s important to wash microfiber towels properly without fabric softener, as softeners coat the fibers and reduce their ability to absorb moisture.
Always use clean and dry microfiber towels when cleaning glass.
Replacing wet or dirty towels during the process significantly improves the glass’s shine.
4. Applying Too Much Product
Many people believe that using more cleaner will yield better results, but the opposite is often true.
Excessive cleaner creates more liquid on the glass, increasing the likelihood of streaks if not thoroughly wiped away.
Excessive product can also drip onto dashboard surfaces or rubber seals.
When cleaner accumulates on a surface, it doesn’t dry properly and leaves visible marks.
A light mist on a towel is usually sufficient to clean one area at a time.
Using a moderate amount of product provides easier control, faster drying and a smoother finish.
5. Neglecting Wiper Blades
Even if the windshield is perfectly clean, dirty or worn wiper blades can quickly ruin the job.
Wiper blades accumulate dust, rubber particles and road grime over time.
When activated, they spread this residue onto the glass, creating new streaks.
Worn blades can also leave thin, curved marks in their path.
Cleaning the rubber edges of the wiper blades with a cloth and a mild alcohol solution helps remove the buildup.
If the blades are worn or hardened, replacing them restores their contact with the glass.
Keeping wiper blades clean prevents streaks on the windshield and improves visibility during rain.
How to Clean Wiper Blades for Better Results
As well as, there’s research that shows that about 90% of the driving decisions actually relies on a driver’s vision, that’s why it becomes really important to have clear windshield for safety purpose. Also, a windshield that appears “clean” to the eye can still scatter the light and create the glare from the sun or the headlights of the vehicles if there is dust, smudges or streaks on the surface of the windshield, even the poor cleaning and worn out windshield wiper blades can turn the rain into smeared visibility problems, that actually reduces your ability to react to the hazards in quick way. So, it is important to maintain both the windshield glass and the wiping system proper to improve the driving safety and of course experience as well.[¹]
Wiper blades play a vital role in keeping your windshield clear, specially during rain, dust, or light snowfall.
Even if your windshield is perfectly clean, poor wiper blade condition can quickly create new streaks and reduce visibility.
Wiper blades are made of rubber and over time, dirt, road oil, small particles of sand and even small pieces of rubber accumulate on them, causing them to wear out.
As the blades move across the glass, they can either clean easily or drag dirt across the surface.
Keeping wiper blades clean and in good condition improves visibility, reduces glare and extends the life of both the blades and the windshield.
1. Why Dirty Wipers Cause Streaks
Dirty wiper blades cause streaks because they spread the remaining water instead of removing it evenly.
When wipers move across the glass, the rubber edge must maintain smooth and even contact with the windshield.
When dirt, dust, or dry grime sticks to the blades, it creates uneven pressure.
This creates thin lines or curved streaks of water that follow the blade’s path.
In some cases, the trapped small particles can act like sandpaper, causing very fine scratches on the glass over time.
Worn rubber can harden or even crack from exposure to heat and sunlight, specially in hot weather.
Hardened rubber doesn’t bend properly, reducing its ability to thoroughly clean away water.
These problems are specially noticeable during heavy rain or during night driving, when visibility is crucial.
2. How to Clean Wiper Blades Properly
Cleaning wiper blades is easy and should be done regularly.
First, lift the wiper arms away from the windshield so you can safely access the rubber edge.
Use a clean microfiber cloth slightly dampened with water or isopropyl alcohol.
Gently wipe the entire length of the rubber blade with light pressure.
You may see a dark mark on the cloth, which is normal and indicates that dirt and old rubber particles are being removed.
Repeat the wiping process until there are no heavy marks left on the cloth.
Cleaning both the rubber edge and the metal frame helps remove trapped dust.
After cleaning, carefully reinstall the blade on the windshield.
Regular cleaning every few weeks, specially after dusty or muddy areas, maintains performance and reduces marks.
3. When to Replace Worn Blades
Even with regular cleaning, wiper blades don’t last forever.
Most wiper blades need to be replaced every six to twelve months, depending on the season and usage.
Signs that they need replacement include persistent marks, movement, creaking, or visible cracks in the rubber.
If large water spots remain on the blades that don’t clear up after cleaning, the rubber edge may be worn or rough.
Exposure to intense sunlight, extreme heat and freezing temperatures can cause rubber to age rapidly.
Replacing worn blades promptly improves wiping performance and prevents unwanted marks on the windshield.
Installing new, high-quality blades provides better water removal, a cleaner appearance and safer driving, even in wet conditions.
Learn, DIY Homemade Windshield Cleaner Recipe
If done correctly, making your own windshield cleaner at home can be easy, inexpensive and effective.
Many commercial glass cleaners work well, but homemade solutions, with the right amount of mixing, can also remove dirt, light grease and mineral residue.
It’s important to use clean ingredients and avoid those that leave residue or damage tinted windows.
Car glass requires a cleaner that evaporates evenly, leaves no minerals behind and safely removes oily deposits.
It’s important to use distilled water instead of tap water, as tap water often contains minerals like calcium and magnesium, which can leave white spots when dried.
Homemade solutions are best for light to medium cleaning and regular maintenance.
1. Distilled Water + White Vinegar Solution
A mixture of distilled water and white vinegar is an easy and natural cleaning solution.
White vinegar contains mild acetic acid, which helps dissolve mineral deposits, light hard water stains and basic dirt.
A common and safe mixture is equal parts distilled water and white vinegar.
Distilled water ensures no additional minerals are added to the glass, while vinegar breaks down deposits without being too harsh.
This solution is specially helpful for removing water spots from rain or sprinkler systems.
However, vinegar has a stronger odor and evaporates more slowly than alcohol-based solutions.
It’s best used for exterior cleaning and mineral spot treatment rather than for heavy-duty grease removal.
After using vinegar, wipe with a clean, dry microfiber towel to ensure no moisture remains on the surface.
2. Distilled Water + Isopropyl Alcohol Mix
A mixture of distilled water and isopropyl alcohol is one of the most effective homemade cleaners for cleaning both exterior and interior windshields.
A safe and commonly used ratio is approximately seventy percent isopropyl alcohol and distilled water.
Alcohol works well because it dissolves oily films, fingerprints and traffic grime quickly.
It also evaporates faster than vinegar, helping to reduce stains when properly wiped.
This makes it specially useful for cleaning the inside of the windshield, where oily stains from dashboard plastic often accumulate.
Alcohol-based mixtures are generally safe for tinted windows when used in small quantities.
Spraying the solution onto a microfiber towel instead of directly on the glass helps prevent overspray and improve control.
3. When is it safe to use a homemade solution?
Homemade windshield cleaners are safe when used correctly and under the right conditions.
They work well for regular maintenance, light dirt, mild water stains and interior fog.
However, they may not be as effective for heavier dirt, such as hardened tree sap, thick insect residue, or raised mineral deposits.
In these cases, specialized automotive products may be more effective.
It’s also important to avoid mixing chemicals carelessly, as some combinations can cause harmful reactions.
Always use a clean container, carefully measure ingredients and if unsure, test the solution on a small area first.
Avoid strong-scented dish soap or additives in homemade solutions, as these can leave a residue.
When used correctly, a simple mixture of vinegar or alcohol with distilled water can produce clean, streak-free results and it’s inexpensive and easy to prepare.
How to Apply Rain Repellent for Longer Cleanliness
Applying rain repellent to your windshield can significantly improve visibility in wet weather and help keep the glass surface clean for longer.
Rain repellents are designed to create a very thin, invisible layer on the glass that changes the behavior of water.
Instead of spreading in flat sheets, water forms small droplets and rolls off quickly as the car moves.
This improves visibility, specially at highway speeds, as less water remains on the surface.
Properly applied repellent can also make future cleaning easier by reducing dirt and water stains on the glass.
For drivers who frequently travel in rain, this extra layer of protection can make a significant difference in comfort and safety.
1. Benefits of Hydrophobic Coatings
Hydrophobic coatings work by reducing the surface energy of the glass.
Simply put, they make the glass less attractive to water.
When water hits untreated glass, it spreads and forms a thin film that can impair vision.
When it hits a treated surface, it forms tight beads that are easily removed by the wind flow while driving.
This beading action reduces the need to constantly use wipers at high speeds.
It also improves reaction time, providing a clearer view of the road during heavy rain.
Another benefit is reduced mineral buildup.
Because water flows more easily, fewer droplets remain to dry, leaving behind hard water spots.
Hydrophobic coatings can also help reduce glare at night by preventing uneven layers of water from reflecting off headlights.
2. How to Apply Hydrophobic Coatings
To properly apply rain repellent, the windshield must first be completely clean and dry.
Any dirt, oil, or residue remaining on the surface will prevent the coating from adhering properly.
Start by thoroughly rinsing and drying the glass.
If necessary, remove any mineral stains or dirt before applying.
Apply a small amount of rain repellent product to a clean applicator pad or microfiber cloth.
Spread it evenly across the windshield using circular or straight strokes.
Make sure it’s completely covered but doesn’t accumulate too much product.
Let the product dry until it becomes slightly hazy, which usually takes a few minutes.
After it dries, gently polish the surface with a clean, dry microfiber towel until the glass is clean and smooth.
Proper polishing is important because any remaining residue can cause streaks for a while.
3. How it Reduces Streaks
Rain repellent reduces streaks because water doesn’t sit flat on the surface long enough to mix with dirt to form streaks.
When untreated glass gets wet, the wipers spray a broad layer of water over the surface and any dirt present can cause streaks.
With a hydrophobic coating, water droplets form and move faster, so wipers have to clean up less moisture.
This reduces friction and reduces the likelihood of streaks.
Because less water remains on the glass after rain, mineral deposits are less likely to form as the droplets dry.
The smooth surface created by the coating also helps wiper blades glide more evenly, improving overall wiping performance.
How to Ensure Night Visibility Test & Learn How to Check for Hidden Streaks
1. Use the Headlight Reflection Method
The easiest and most effective way to find hidden streaks on your windshield is to use the headlight reflection method at night.
The glass may appear crystal clear during the day, but when a bright light shines on it from a specific angle, any remaining residue, grease, or cleaner becomes very visible.
To do this correctly, park your car in a dark area and turn on the headlights.
Sit inside the car and look through the windshield while the headlights are shining forward.
You can also park the car against a wall or garage door so that some light is reflected backward.
If there are streaks, you will see lines, spots, or blurry spots where light is not reflecting properly.
This happens because even a thin layer of residual cleaner or oil alters the way light passes through the glass.
Clear glass allows light to pass through, but any remaining film scatters light and causes glare.
If you notice streaks, wipe the windshield again with a clean, dry microfiber cloth and use straight, overlapping motions to remove any remaining film.
This simple test is specially important because at night, glare from oncoming traffic can reduce visibility and strain your eyes, making it difficult to drive safely.
2. Check under a streetlight
Another very reliable way to check for hidden streaks is to examine your windshield under a bright streetlight.
Streetlights shine downward at a different angle than sunlight, helping to reveal flaws hidden in daylight.
Drive slowly to a well-lit parking area at night and carefully examine the windshield from both inside and outside the car.
Turn your head slightly to the left and right, as changing the viewing angle helps you see fine streaks or blurred spots.
If the glass isn’t completely clean, you may notice faint streaks or thin arcs where the wipers have been running.
These marks often appear when the cleaning solution isn’t rinsed thoroughly or when the wiper blades spread dirt instead of removing it.
Checking under a streetlight is helpful because it mimics the real-life conditions of night driving, where artificial light and headlights can cause glare.
If you don’t notice a persistent glare, wipe the area again with a new microfiber cloth, making sure the cloth is dry and lint-free.
A thorough check under a streetlight ensures your windshield is completely clean before a long night drive.
3. Look for Blurred Patterns
Fluored patterns are another clear sign that something remains on the windshield even after cleaning.
Haze usually appears as a thin, hazy layer rather than clear streaks and it’s more noticeable when light shines on the glass at an angle.
This haze is often caused by using too much cleaning product, not drying the glass properly, or cleaning in damp areas where the solution evaporates slowly.
To check for haze, get out of the car at night and look at the windshield from different angles while the light shines on it.
You may notice rainbow-like sheens, faint hazy areas, or circular wipe marks.
These patterns mean a thin layer of cleaner or mineral deposits is still present.
Haze can reduce contrast and make it difficult to see road markings or pedestrians at night.
If you notice haze, instead of applying it directly to the glass, lightly spray a small amount of glass cleaner onto a microfiber cloth and polish the surface thoroughly until it’s completely clean.
Testing the fog pattern is crucial because even a small amount of dirt can create more glare in the dark than during the day, impacting both driving comfort and safety.
Read More:
Conclusion – How to Clean Car Windshield Without Streaks
By following these steps you can clearly see the difference between average visibility and crystal-clear vision; and it plays a major role in how safely you see the road ahead.
Basically, a clear glass allows light to pass through evenly, reducing glare, improving contrast and helping your eyes adjust quickly to changing road conditions.
Even thin layers of dust, oil, or cleaner residue can scatter light and create streaks that can be dangerous at night or during rain.
You just have to use the right tools such as: a clean microfiber cloth, the right glass cleaner and well-maintained wiper blades, not only removes visible dirt but also removes invisible films that cause haze.
Also, there are small things like cleaning wiper blades, avoiding excess product and checking for hidden streaks make a big difference in the end.
When your windshield is truly clean, you see clearly, there’s less eye strain and your reaction time on the road improves.
Now, that’s all from this guide and if you still have questions, then write them down in the comment section.
Frequently Asked Questions
Q1. What’s the best way to clean a car windshield without leaving marks?
Answer: The best way to clean a car windshield without marks is to use a good-quality glass cleaner and a clean microfiber cloth. Always park your car in a shaded area, as direct sunlight can cause the cleaner to dry too quickly and leave marks. To avoid overspray and uneven drying, spray the cleaner onto the cloth instead of directly onto the glass. Wipe the windshield in straight, overlapping motions instead of circular motions. After cleaning, use another dry microfiber cloth to lightly polish the glass. This removes any remaining moisture or cleaner that could cause marks. Taking your time and using clean tools makes a big difference in achieving a perfectly clean finish.
Q2. Why are there marks on my windshield even after cleaning?
Answer: Windshields often become stained due to leftover debris, dirty cloths, or excessive cleaning product. Many people use too much spray, thinking it will clean better, but too much liquid can dry evenly and leave marks. Another common cause is using paper towels, which can leave behind lint and small fibers. Dirty microfiber cloths can spread oil and dirt instead of removing them. Sometimes streaks are caused by grease or fingerprints from dashboard vents that weren’t cleaned thoroughly. To fix this, use a new microfiber cloth, apply a little cleaner and polish the glass thoroughly until it feels smooth and dry.
Q3. Can I use household glass cleaners on my car’s windshield?
Answer: Yes, you can use many household glass cleaners on the outside of your windshield, but you should be careful with tinted windows. Some household cleaners contain ammonia, which can damage the window tint film and cause it to fade or peel over time. If your car windows are tinted, it’s safer to use an ammonia-free automotive glass cleaner. Always check the label before using any product. For best results, choose a cleaner specifically formulated for car glass, as it’s designed to remove road grime, insect residue and oily film without damaging automotive surfaces.
Q4. How often should I clean my windshield?
Answer: You should clean your windshield whenever you notice dirt, stains, or reduced visibility. For most drivers, cleaning the outside once a week is a good practice, specially if you drive daily. If you live in an area with a lot of dust, pollution, rain, or insects, you may need to clean it more often. The inside of the windshield should also be cleaned at least once every few weeks, as dust, smoke and dashboard gases can form a thin film on the glass. Regular cleaning prevents buildup and makes each cleaning session easier and faster.
Q5. Why is it important to clean the inside of the windshield?
Answer: Cleaning the inside of the windshield is crucial because invisible films can build up over time. These films are often caused by dust, air pollution, smoke and gases emitted from the dashboard material. When sunlight or headlights hit this film, it creates glare and haze, making it difficult to see clearly. Many drivers focus only on the outside mirror and forget the inside mirror, but the remaining inside can have an equally significant impact on visibility. Keeping the inside clean improves cleaning, reduces glare at night and makes driving safer.
Q6. What type of cloth is best for cleaning car windows?
Answer: Microfiber cloths are the best choice for cleaning car windows. They are soft, absorbent and designed to trap dirt and liquid without scratching the surface. Unlike paper towels or regular cloths, microfiber cloths don’t leave lint. For best results, use a cloth for the solution and a dry cloth for buffing. Make sure the cloth is clean before each use, as trapped dirt can cause streaks or small scratches. Washing microfiber cloths separately without fabric softener maintains their effectiveness.
Q7. How do wiper blades affect streaks on your windshield?
Answer: Dirty or worn wiper blades can cause streaks on your windshield, even when your windshield is clean. Dirt, dust and road oil accumulate on wiper blades over time. When you use them, they can spread this dirt across the glass instead of wiping it away. Worn rubber edges can also leave streaks or uneven water patterns during rain. Regularly cleaning your wiper blades with a damp cloth helps remove buildup. If the rubber appears cracked, hardened, or rough, it’s time to replace them. Good wiper blades work in conjunction with a clean windshield to provide clear visibility on wet surfaces.
References:
[1] Windshields And Visibility
https://www.bevindustry.com/articles/84206-windshields-and-visibility

Guys, I’m a car audio enthusiast and customization expert and I love clear sound and clean installation. Plus, I have spent years helping people build their dream audio setups. And whenever I’m working on cars, I probably listen to music and thinks about the next big upgrade.