Written By: Don Dodi
Fact Checked By: Kristen Brown
Reviewed By: Diego Rosenberg
If you’re hearing loud exhaust noise unexpectedly, then it is the first warning of potential exhaust leak.
Actually, your car’s exhaust system is literally designed to safely carry out harmful gases such as: carbon monoxide away from the engine and out of the vehicle as well, also it reduces the noise and improves the engine efficiency as well: that quality makes “CAR EXHAUST” hell lot of important.
But, if there’s a leak in this exhaust system: whether it is in exhaust manifold, pipes or muffler; doesn’t matter at all as wherever it is, it literally disrupts this process and causes loud noise and that leads to reduces fuel efficiency and with the bad luck its dangerous fumes starts to leak in the cabin as well.
And, there’s even studies that shows that even a small exhaust leak is enough to lower the engine performance as it literally affects the balance of air and fuel that the engine literally relies on to run the vehicle smoothly.
Plus, with this guide you’ll able to understand How to Fix Exhaust Leak as this guide covers everything from tools to all the way up to the fixing that exhaust leak and by doing so: you can save ton of money.
Let’s Understand About the Exhaust System
The exhaust system is a vital component of a vehicle, responsible for safely expelling the harmful gases produced during fuel combustion.
Additionally, it regulates engine noise and enhances the vehicle’s overall performance.
When fuel burns inside the engine, it generates gases such as carbon monoxide, nitrogen oxides and hydrocarbons.
If these gases are not properly vented from the vehicle, they can pose a serious hazard.
The exhaust system ensures the efficient expulsion of these gases and helps maintain the optimal back pressure necessary for the engine to function correctly.
A properly functioning exhaust system improves fuel efficiency, reduces pollution and keeps the engine in peak condition.
Conversely, if the system develops a fault or a leak, it can degrade the vehicle’s performance, increase fuel consumption and even endanger the health of the vehicle’s occupants.
Understanding how this system operates, and the specific contribution of each of its components, enables you to identify potential issues early on, thereby helping you keep your vehicle safe and running efficiently.
1. Key Components of the Exhaust System
Exhaust Manifold
The exhaust manifold is the initial component of the exhaust system, connecting directly to the engine.
It collects the exhaust gases emitted from each cylinder and channels them into a single pipe.
It is constructed from durable materials such as: cast iron or stainless steel, as it must withstand extremely high temperatures and pressures.
Any cracks or leaks in the manifold can result in loud noises and negatively impact the engine’s operational efficiency.
Oxygen Sensor
Oxygen sensors are installed within the exhaust system to monitor the levels of oxygen present in the exhaust gases.
These sensors transmit data instantly to the Engine Control Unit (ECU), which then adjusts the fuel-air mixture to ensure complete combustion.
If an oxygen sensor malfunctions, fuel efficiency may decrease, emissions may rise and engine performance issues may arise.
Catalytic Converter
The catalytic converter plays a crucial role in reducing harmful gases.
It converts toxic gases such as: carbon monoxide, nitrogen oxides and hydrocarbons, into less harmful substances, such as carbon dioxide and nitrogen.
This transformation occurs through a chemical process involving the use of precious metals like platinum and palladium.
If the catalytic converter fails or becomes clogged, engine power may diminish and emission levels may increase.
Resonator
The resonator is designed to refine and smooth out the exhaust sound before it reaches the muffler.
It functions by canceling out specific sound frequencies, thereby reducing loud or harsh noises.
Although not all vehicles are equipped with a resonator, it plays a significant role in enhancing the overall quality of the exhaust sound.
Muffler
The primary function of the muffler is to dampen the loud noise generated by the engine through the use of multiple chambers and sound-absorbing materials.
It regulates sound waves, ensuring the vehicle remains quiet and providing a more comfortable driving experience.
A defective muffler often results in excessively loud exhaust noise and may indicate internal corrosion or the presence of holes.
Exhaust Pipes
The exhaust pipes connect all the components of the exhaust system, channeling the gases from the engine toward the rear of the vehicle.
These pipes must be robust enough to withstand heat, moisture and road debris.
Over time, these components may corrode or develop perforations, leading to exhaust leaks and a reduction in the system’s overall efficiency.
2. How the Exhaust System Works
The Flow of Gases from Engine to Tailpipe
This process begins when fuel combusts inside the engine cylinders, generating exhaust gases that exit through the exhaust valves into the exhaust manifold.
From there, the gases travel through the exhaust pipes and pass by the oxygen sensors, which assist in monitoring and optimizing engine performance.
Subsequently, the gases enter the catalytic converter, where harmful substances undergo chemical transformation; they then pass through the resonator and muffler, which work in tandem to regulate noise levels.
Finally, the gases exit the vehicle through the tailpipe, having been rendered significantly safer and less harmful than their original state.
The Role of Each Component in Reducing Pollution and Noise
Each component of the exhaust system plays a distinct role in making the vehicle cleaner and quieter.
Oxygen sensors ensure that the engine combusts fuel efficiently, thereby minimizing unnecessary pollution.
The catalytic converter reduces the levels of toxic gases released into the environment.
The resonator and muffler mitigate noise levels by controlling and absorbing sound vibrations, ensuring the vehicle operates quietly.
Together, these components form a balanced system that protects the environment, enhances engine performance and delivers a smooth and comfortable driving experience.
Know, The Common Causes of Exhaust Leaks
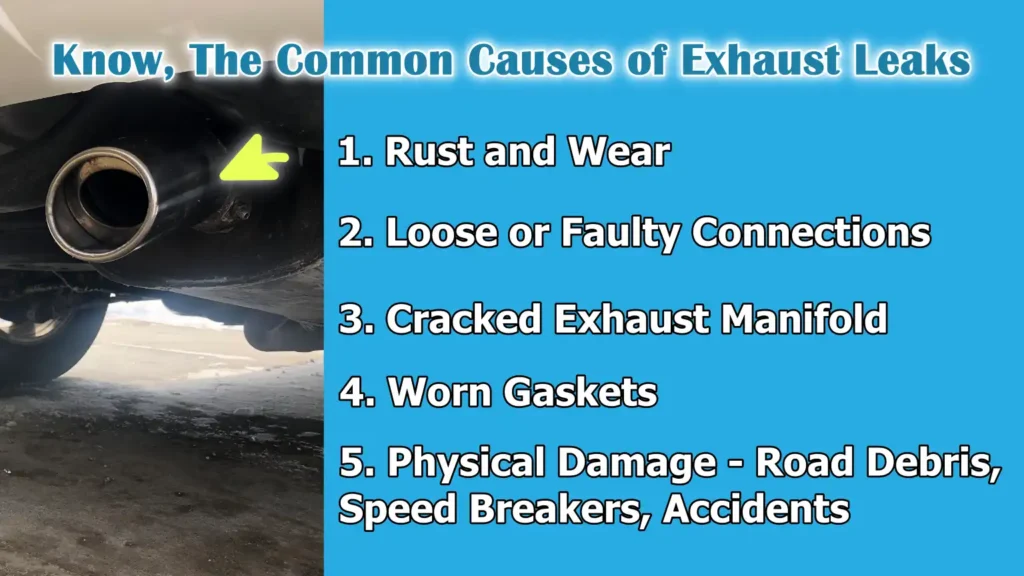
Exhaust leaks typically occur due to wear and tear over time, exposure to heat and subjection to harsh conditions.
Understanding the causes of these leaks can help you avoid serious damage and costly repairs.
The exhaust system operates at extremely high temperatures and is constantly exposed to moisture, dirt and road debris; consequently, it is more prone to deterioration or failure compared to many other parts of the vehicle.
Even a minor leak can disrupt the flow of exhaust gases, reduce engine efficiency, increase fuel consumption and allow harmful gases to escape before they are properly filtered.
In many cases, exhaust leaks begin as minor issues such as: a loose connection or a small patch of rust, but if left unaddressed, they can quickly escalate into major cracks or holes.
Identifying the most common causes enables drivers to inspect their vehicles more effectively and take necessary preventive measures before any problem becomes severe.
1. Rust and Wear
Rust and wear are among the most common causes of exhaust leaks, as the exhaust system is constantly exposed to moisture, heat and air, making the gradual deterioration of the metal over time inevitable.
When the vehicle is driven, water vapor forms inside the exhaust pipes as a by-product of the combustion process.
If the car is used primarily for short trips, this moisture may not fully evaporate, leading to internal corrosion.
Furthermore, external factors such as rain, mud and road salt can accelerate the rusting process, particularly in regions with humid or wet climates.
As rust spreads, it compromises the structural integrity of the metal, creating tiny holes or cracks through which exhaust gases begin to escape.
This type of damage is often overlooked initially, but it gradually worsens over time; therefore, timely inspection is crucial.
2. Loose or Faulty Connections
Loose or faulty connections within the exhaust system can easily lead to leaks, as the system comprises numerous components joined together using clamps, bolts and gaskets.
Over time, constant engine vibrations and driving on rough roads can cause these connections to loosen.
In some instances, bolts may wear out, clamps may weaken, or joints may shift slightly out of alignment, creating small gaps through which exhaust gases can escape.
Faulty connections can also result from improper installation or repairs that were not executed correctly in the past.
Even a minor gap can disrupt the pressure balance within the exhaust system, leading to excessive noise and reduced performance; furthermore, if not tightened or repaired promptly, it can cause long-term damage to the vehicle.
3. Cracked Exhaust Manifold
The exhaust manifold is exposed to extreme temperatures because it connects directly to the engine; this repetitive cycle of heating and cooling causes the metal to repeatedly expand and contract.
Over time, this thermal stress can cause cracks to form in the manifold, particularly if the material has weakened due to age or is of inferior quality.
A cracked manifold often produces a distinct ticking or tapping sound and can degrade engine performance by allowing exhaust gases to escape the system prematurely.
As the manifold plays a crucial role in collecting gases from the engine, any crack in this component can significantly impact the vehicle’s overall efficiency and safety.
4. Worn Gaskets
Gaskets are used to create a robust seal between various components of the exhaust system and to prevent gas leaks at connection points.
These gaskets are constructed from materials capable of withstanding extreme heat; however, over time, due to constant exposure to high temperatures and pressure, they may wear out, crack, or lose their sealing effectiveness.
When a gasket fails, it creates a small gap through which exhaust gases can escape, often resulting in a distinct hissing sound.
Worn gaskets are a common cause of leaks, as they naturally deteriorate with use; replacing them is often a simple yet essential step to ensure the exhaust system remains leak-free.
5. Physical Damage – Road Debris, Speed Breakers, Accidents
Physical damage is a primary cause of exhaust leaks, particularly because the exhaust system is situated beneath the vehicle, where it is constantly exposed to external impacts.
Driving too fast over speed bumps, hitting potholes, or coming into contact with road debris such as: stones or metal objects, as it can cause dents or cracks in the exhaust components.
In more severe cases, minor accidents or collisions can dislodge or fracture parts of the exhaust system.
Even a minor dent can disrupt airflow or create a weak point, potentially leading to exhaust leaks later on.
As such damage can occur unexpectedly, it is crucial to regularly inspect the underside of the vehicle to identify and promptly address any issues.
Tools
| Item | Details |
|---|---|
| Jack and Jack Stands | These are used to safely lift your car, allowing you to access the exhaust system located underneath. The jack lifts the car, while the stands hold it steady in place. To prevent accidents, always use these tools on a level surface. |
| Wrench Set | A wrench set helps you loosen and tighten the bolts and nuts connecting the various parts of the exhaust system. Wrenches of different sizes are required, as not all bolts are the same size. Using the correct-sized wrench prevents damage and makes the task easier. |
| Screwdrivers | Screwdrivers are used to remove or tighten screws and clamps within the exhaust system. This may require both flat-head and Phillips-head screwdrivers. Although they may appear to be simple tools, they are extremely useful for minor repairs. |
| Safety Gloves and Goggles | These items protect your hands and eyes while you are working underneath the car. Gloves guard against cuts and burns, while goggles prevent dust and debris from entering your eyes. Using safety gear is absolutely essential when performing any type of repair work. |
| Exhaust Repair Tape | This tape is used to quickly patch small holes or cracks in the exhaust pipe. It is heat-resistant and wraps tightly around the damaged area. It serves as an excellent temporary solution until a permanent repair can be performed. |
| Epoxy or Exhaust Sealant | This is a paste-like substance that seals cracks and minor leaks within the exhaust system. Once applied, it hardens and can withstand high temperatures. Compared to exhaust tape, it offers a stronger and more durable solution. |
| Replacement Clamps | Clamps are used to securely hold the exhaust pipe and its joints together. If the existing clamps have become loose or deteriorated, new clamps help create a robust seal and prevent exhaust gases from leaking out. |
| Patch Kits | Patch kits also include metal or fiber patches, applied using clamps or adhesives, which are designed to cover larger holes. These patches are more durable than repair tapes; if applied correctly, they can provide a long-lasting fix. They are useful for repairing moderate levels of damage. |
| Replacement Parts – If Needed | If the damage is extensive, it may be necessary to replace components such as the pipe, muffler, or manifold. New parts restore the system’s functionality and ensure its long-term reliability. This is the most effective solution for major leaks. |
How to Ensure Safety By Taking Precautions Before Starting
Before attempting to repair an exhaust leak, it is crucial to observe proper safety precautions, as the exhaust system involves extreme heat, toxic gases and confined spaces beneath the vehicle.
Many accidents occur not because of the repair work itself, but due to the neglect of basic safety measures such as: working on a hot exhaust or failing to properly secure the vehicle.
When the engine is running, the temperature of the exhaust system can reach several hundred degrees Celsius; furthermore, harmful gases like carbon monoxide can be dangerous even in small quantities if inhaled in an enclosed space.
Taking a few simple precautions not only protects you from injury but also ensures that the repair work is completed smoothly, effectively and without any unnecessary risks.
Understanding and adhering to these safety measures is essential, whether you are a novice or have prior experience with mechanical work.
1. Allow the Exhaust to Cool Completely
When the engine is running, the exhaust system becomes extremely hot and touching it immediately after shutting off the vehicle poses a risk of severe burns.
It is imperative that you allow the vehicle to sit for at least 30 to 60 minutes, giving the exhaust components sufficient time to cool down completely, before you begin any inspection or repair work.
Metal components such as: the exhaust manifold and pipes, as it can retain heat for a considerable time even after the engine has been turned off; therefore, attempting to inspect them by hand without taking proper precautions can be dangerous.
Waiting for the system to cool down ensures that you can work safely and comfortably, without the risk of injury.
2. Work in a Well-Ventilated Area
Exhaust gases contain harmful substances such as carbon monoxide, a colorless and odorless gas that can be extremely dangerous if inhaled in an enclosed or poorly ventilated space.
Always perform exhaust repairs in an open area or a well-ventilated garage where fresh air can circulate freely.
Running the engine for diagnostic purposes in an enclosed space can lead to a rapid accumulation of toxic gases, potentially causing dizziness, breathing difficulties, or other serious health risks.
Working in a well-ventilated environment ensures that the air remains safe, allowing you to work without worrying about exposure to harmful fumes.
3. Properly Lift and Secure the Vehicle
As the exhaust system is located underneath the vehicle, you will need to lift the vehicle to access it; doing so safely is absolutely critical.
Use a sturdy and reliable jack to lift the vehicle and always place jack stands underneath it to securely support the vehicle in position.
Never rely solely on the jack, as it may fail or slip, causing the vehicle to fall and potentially resulting in serious injury to you.
Ensure that the vehicle is situated on a level and stable surface and double-check that it is properly secured before getting underneath it.
4. Wear Safety Equipment
Wearing appropriate safety equipment while working on the exhaust system significantly reduces the risk of injury.
Gloves protect your hands from sharp edges, rusted metal and hot surfaces, while safety goggles shield your eyes from dust, debris and small particles that may fall while working underneath the vehicle.
In some instances, wearing a mask may also be beneficial to avoid inhaling dust or fumes during the repair process.
Using basic safety equipment makes the work significantly safer, allowing you to focus on resolving the problem without facing any unnecessary risks.
How to Detect an Exhaust Leak
Detecting an exhaust leak is a crucial step before undertaking any repair work, as it helps you pinpoint the exact location of the problem and avoids unnecessary effort.
Exhaust leaks often originate from a small crack and are not always immediately visible; however, they typically present clear warning signs, such as unusual noises, a decline in performance, or a strong exhaust odor.
The exhaust system operates under pressure; therefore, even a minor crack or a loose joint can allow gases to escape, negatively impacting engine efficiency and potentially increasing emissions.
Timely detection not only saves on repair costs but also protects critical components such as: the catalytic converter, from further damage.
By employing a few simple and practical methods, most exhaust leaks can be detected right at home without the need for specialized tools, provided you follow safe and cautious procedures.
1. Visual Inspection
Conducting a visual inspection is one of the easiest and most effective methods to initiate the process of detecting an exhaust leak.
First, look underneath the vehicle and check the exhaust pipe, muffler and joints for any visible signs of damage such as: holes, cracks, or rust spots.
Rust is a very common cause of leaks and often manifests as rough, flaky patches on the metal surface, which can eventually develop into holes.
Additionally, check for black soot marks around joints or connections, as these marks serve as a clear indication that exhaust gases are escaping from that specific location.
A careful and patient inspection can often help you quickly identify a problem without the need for any specialized equipment.
2. Listening for Unusual Sounds
Paying attention to the sounds your vehicle makes while the engine is running is another simple method for detecting an exhaust leak.
Leaks often produce distinct sounds such as: hissing, tapping, or a loud rumbling, that differ from the normal operating sounds of the engine.
Small leaks typically emit a sharp hissing or ticking sound, particularly when the engine is first started, whereas larger leaks may produce a deeper, louder rumbling noise.
As you accelerate the vehicle, these sounds may become even more pronounced, as the pressure within the exhaust system increases.
Paying close attention to these changes in sound can help you pinpoint the exact location of the leak.
3. Feeling for Escaping Air
Another effective technique involves carefully feeling for air escaping from around the exhaust system; however, this task must be performed with extreme caution to avoid injury.
While the engine is running, you can position your hand near the area where you suspect a leak, taking care not to touch any hot components.
By doing so, you can detect whether a stream or puff of air is escaping through a crack or gap.
Maintaining a safe distance and avoiding direct contact with exhaust components is crucial, as they may still be extremely hot.
This method is particularly useful for detecting leaks that may not be visible to the naked eye but still allow pressurized gases to escape.
4. The Soapy Water Method
The soapy water method is a simple and reliable way to confirm the presence of an exhaust leak.
By mixing soap with water and applying it to the parts of the exhaust system where you suspect a leak, you can observe whether bubbles form while the engine is running.
The escaping gases create pressure, causing the soapy solution to bubble up at the exact location of the leak.
This method is particularly helpful for detecting small leaks that are difficult to see or hear.
It is easy to perform and requires no expensive tools, making it a popular technique among beginners.
5. Smoke Test – Advanced Method
The smoke test is a more advanced and highly accurate method for detecting exhaust leaks, often performed using specialized equipment.
In this process, smoke is introduced into the exhaust system; if a leak is present, smoke will be seen escaping from the damaged areas.
This method is highly effective at identifying even very small leaks that might go undetected using other techniques.
Although typically performed in professional workshops, some advanced users can also conduct this test at home using a portable smoke tester.
The smoke test provides clear results and is particularly useful when other methods fail to pinpoint the problem precisely.
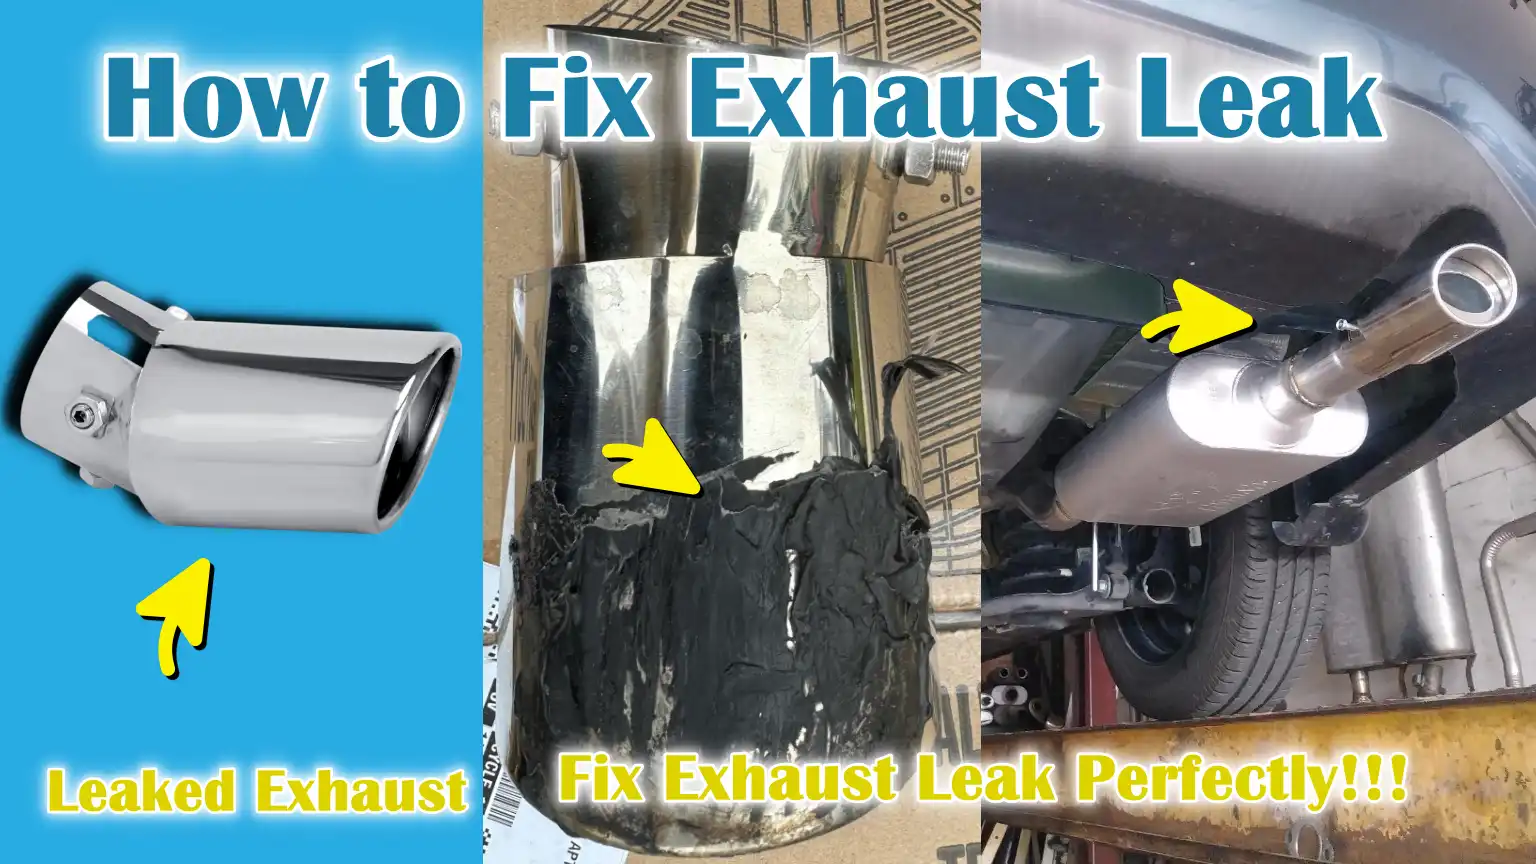
How to Fix Exhaust Leak – Quick & Practical Guide
To properly repair an exhaust leak, it is essential to understand the root cause of the problem and select the appropriate method based on the condition of the exhaust system.
Many leaks result from loose connections, minor cracks, or worn-out components; in such cases, the system can often be restored through simple repairs without the need to replace major parts.
The exhaust system operates under pressure; consequently, even a small crack can negatively impact engine performance, increase noise levels and allow harmful gases to escape.
For this reason, adopting a systematic, step-by-step approach is crucial: begin with the simplest and most common repairs and then proceed to more complex fixes.
Properly repairing a leak not only improves fuel efficiency and enhances engine performance but also ensures that harmful exhaust gases are safely expelled from the vehicle.
Taking the time to carefully inspect and address the issue can prevent future damage and save on repair costs in the long run.
1. How to Tighten The Loose Connections
Locate Loose Bolts or Clamps
The first step is to carefully inspect the exhaust system and identify any loose bolts, nuts, or clamps that join the various components of the system.
These connections can loosen over time due to constant vibration, thermal expansion caused by heat and road conditions.
Pay particular attention to the joints between pipes, mufflers and other components, as these are common areas where leaks are most likely to occur.
Even a slightly loose clamp can provide sufficient space for exhaust gases to escape; therefore, it is essential to thoroughly inspect every connection.
Tighten Using the Correct Tools
When you discover a loose connection, use the appropriately sized wrench or tool to firmly tighten the bolt or clamp.
Applying the correct amount of force is crucial to ensure that the connection is secure without damaging the threads or causing the clamp to break.
Proper tightening re-establishes the seal between components and prevents gases from leaking out.
If a clamp or bolt is damaged or worn, it should be replaced rather than reused to maintain a strong and reliable connection.
Re-check for Leaks
After tightening all connections, start the engine and re-check for any signs of leaks, such as unusual noises or escaping air.
This step is vital, as it confirms whether the repair was successful or if there are still other leaks remaining in the system.
Sometimes, fixing one loose connection may reveal another weakness nearby; therefore, a final inspection ensures that the entire system is properly sealed.
Taking the time to re-check ensures that the repair work has been completed thoroughly and effectively.
2. How to Fix Exhaust Leak By Using Exhaust Repair Tape
Using exhaust repair tape is the fastest and easiest way to fix small exhaust leaks, specially when the damage is limited to small holes or minor cracks in the pipes.
This type of tape is specifically designed to withstand the extreme temperatures and pressures found within exhaust systems, making it an excellent temporary solution until a permanent repair can be implemented.
It works by creating a strong seal over the damaged area, preventing exhaust gases from escaping and partially restoring the system’s functionality.
Although it is not a long-term solution for severe damage, it can effectively reduce noise, improve performance and prevent harmful fumes from leaking out.
This method is easy to apply and requires no specialized tools, making it ideal for beginners seeking a simple and immediate fix.
Thoroughly Clean the Surface
Before applying the repair tape, it is crucial to thoroughly clean the damaged area to ensure that the tape adheres firmly and creates a strong seal.
Dust, grease, rust and moisture can prevent the tape from sticking properly, potentially causing the repair to fail prematurely.
Use a cloth or brush to remove loose rust and debris and if possible, lightly sand the surface to smooth it out.
A clean and dry surface helps the tape adhere securely, thereby enhancing the effectiveness and durability of the repair.
Tightly Wrap the Tape Around the Leak
Once the surface is clean, carefully wrap the exhaust repair tape around the leak, ensuring that it completely covers the damaged area.
The tape must be applied tightly and evenly; wrap multiple layers around the pipe to ensure a robust seal.
Overlapping the tape while wrapping increases its strength and prevents the formation of gaps through which gas could leak.
Proper wrapping is crucial because the exhaust system operates under pressure and if the tape is applied loosely or unevenly, it will be unable to withstand the pressure generated during operation.
Allow It to Dry Completely
After applying the tape, it is essential to allow it to dry completely so that it hardens and forms a durable seal.
Some tapes begin to cure upon exposure to heat, meaning that running the engine for a short period can aid this process, while other tapes may require a specific waiting period, as outlined in the product instructions.
Allowing sufficient time for drying ensures that the tape becomes strong enough to withstand the heat and pressure of the exhaust system.
Skipping this step can result in a weak repair that fails prematurely; therefore, patience is essential to achieve the best results.
How to Fix Exhaust Leak By Applying Exhaust Sealant or Epoxy
Applying exhaust sealant or epoxy is a reliable and more durable method for repairing small to medium-sized exhaust leaks specially when compared to repair tape.
These materials are specifically designed to withstand the extreme temperatures and pressures found within exhaust systems; they can often endure heat reaching several hundred degrees Celsius without degrading.
Exhaust sealants and epoxies work by filling cracks, holes, or gaps and then curing to form a strong, heat-resistant layer that prevents exhaust gases from escaping.
This method is typically used for leaks occurring around joints, seams, or slightly damaged pipes where a robust seal is required.
Although generally considered a repair solution for moderate damage, if applied correctly, it can last significantly longer than temporary fixes.
Proper surface preparation and correct application are crucial to ensure that the seal holds up under heat and pressure and does not fail prematurely.
Clean and Dry the Area
Before applying any sealant or epoxy, it is essential that the surface is completely clean and dry to ensure proper adhesion of the material.
Dirt, rust, grease and moisture can compromise the bond, potentially causing the sealant to crack or peel away when exposed to heat.
Use a wire brush or sandpaper to remove rust and rough edges and then wipe the area clean with a dry cloth.
If the surface is not properly prepared, even a high-quality sealant will fail to adhere correctly, potentially leading to recurring leak issues.
A clean and dry surface guarantees a strong and long-lasting repair.
Apply the Sealant Evenly
Once the surface is prepared, apply the exhaust sealant or epoxy evenly over the damaged area, ensuring that the crack or hole is completely covered.
It is crucial to spread the material smoothly so that no voids or weak spots remain through which gases could escape.
In some cases, applying a slightly thicker layer can enhance durability, particularly for larger cracks.
Proper application ensures that the sealant forms a robust barrier capable of withstanding both the heat and pressure present within the exhaust system.
Allow it To Dry According to the Instructions
After applying the sealant or epoxy, it is essential to allow sufficient time for it to dry (cure) properly so that it can harden and become strong enough to withstand exhaust conditions.
Drying times vary for different products; some may require engine heat to set completely, while others require a specific waiting period before use.
For best results, it is crucial to follow the manufacturer’s instructions.
Allowing adequate curing time ensures that the repair is durable, heat-resistant and capable of preventing leaks over the long term.
How to Fix Exhaust Leak By Applying a Patch Kit
Applying a patch kit is a robust and practical method for repairing exhaust leaks.
It is typically used for leaks that are too large to be fixed with tape or sealant, yet do not yet require the replacement of the entire component.
A patch kit typically consists of a heat-resistant metal or fiber patch, along with clamps or a specialized adhesive capable of withstanding the high temperatures and pressures present within the exhaust system.
This method works by completely covering the damaged area and reinforcing it, thereby preventing exhaust gases from escaping.
Patch kits are commonly used to seal holes or cracks in exhaust pipes or mufflers and when applied correctly, they provide a long-lasting solution.
This is a cost-effective remedy, as it restores the structural integrity of the damaged section without the need to replace the entire component.
Proper application is crucial, as the exhaust system is constantly subjected to temperature fluctuations and vibrations; this means the patch must be securely and tightly sealed to prevent future leaks.
Cut the Patch to the Correct Size
The first step involves measuring the damaged area and cutting the patch to the appropriate size so that it completely covers the hole or crack.
The patch should be slightly larger than the damaged area to ensure full coverage and to provide the necessary structural support.
Cutting the patch to the exact dimensions is critical; if the patch is too small, it will fail to seal the leak and if it is too large, it will not fit properly.
Using a correctly sized patch ensures that the repair is both durable and reliable.
Secure with Clamps or Adhesive
Once the patch is ready, it is crucial to apply it firmly to the damaged area.
Depending on the type of kit being used, either clamps or high-temperature adhesives are employed for this task.
Clamps are tightened around the pipe to hold the patch in place, while adhesives help bond the patch directly to the surface.
It is essential to tighten the clamps evenly or apply the adhesive correctly to ensure the patch does not shift or loosen during operation.
A secure application guarantees that the patch can withstand the heat, pressure and vibrations generated while driving.
Ensure the Seal is Completely Tight
After applying the patch, it is vital to verify that the seal is completely tight to prevent any exhaust gases from escaping.
Carefully inspect the edges of the patch for any gaps or loose sections and make adjustments as necessary.
A proper seal not only prevents leaks but also helps maintain the correct pressure within the exhaust system, a critical factor for optimal engine performance.
Verifying the repair after installation ensures that the patch is functioning correctly and provides a reliable, long-lasting solution.
How to Fix Exhaust Leak By Replacing Damaged Components
Replacing damaged components is the most reliable and long-lasting solution for fixing exhaust leaks, specially when the damage is extensive such as: large holes, severe corrosion, or major cracks that cannot be repaired using tape, sealants, or patch kits.
The exhaust system operates under extreme heat and pressure; when a component becomes severely degraded, temporary repairs offer only short-term relief.
In such cases, replacing the damaged part restores the system to its original condition, ensuring proper gas flow, reducing emissions and improving engine performance.
Although this method may require more time, effort and expense, it offers the greatest durability and safety.
Modern replacement parts are manufactured to meet rigorous standards, thereby maintaining fuel efficiency and ensuring that the vehicle remains compliant with emissions regulations.
It is crucial to understand when and how to replace damaged components to ensure the exhaust system remains reliable and durable over the long term.
Identify Severely Damaged Components
The first step is to thoroughly inspect the exhaust system to identify the specific component that is too severely damaged to be repaired.
This may involve parts exhibiting large holes, extensive corrosion that has compromised the structural integrity of the metal, or cracks that continue to propagate despite previous repair attempts.
Components that may require replacement include the exhaust manifold, piping, or muffler.
Accurate identification is essential, as replacing only the damaged section saves both time and money while restoring the system to proper working order.
Remove the Old Part
Once the faulty part has been identified, it must be removed carefully.
This involves loosening the bolts, clamps, or connectors that hold it in place.
Over time, due to rust or exposure to heat, these connections can become extremely tight; therefore, the right tools and patience are required to avoid damaging surrounding components.
Removing the old part allows you to thoroughly clean the affected area and prepare the space for installing the new component.
It also serves as an excellent opportunity to inspect adjacent parts for any signs of wear and tear or structural weakness.
Install the New Manifold, Pipe, or Muffler
After removing the old part, the new component should be installed in its place.
Ensure that it fits correctly and connects securely to the rest of the exhaust system.
Tighten all bolts and clamps firmly to create a proper seal and prevent any future leaks.
Installing a new manifold, pipe, or muffler restores the integrity and functionality of the exhaust system, allowing exhaust gases to exit the vehicle smoothly and safely.
A properly installed replacement not only permanently resolves leak issues but also enhances the vehicle’s overall performance, reduces noise levels and ensures a safer driving experience.
How to Repair Exhaust Leaks Based on Location
Repairing an exhaust leak becomes significantly easier and more effective when you can pinpoint the exact location of the leak, as different sections of the exhaust system are subjected to varying levels of heat, pressure and wear and tear.
Leaks occurring near the engine such as: those in the exhaust manifold, are generally more critical, as they directly impact engine performance and must withstand extremely high temperatures.
Leaks situated further downstream in the system such as: those in the piping or muffler, are often easier to repair; nevertheless, they can still lead to excessive noise, reduced performance and the emission of harmful gases.
Ensuring a proper and durable repair for each specific location requires a slightly different approach, a distinct set of tools and specific safety precautions.
By accurately identifying the leak’s location and employing the appropriate repair method, you can enhance safety, restore performance and avoid the need for repetitive repairs in the future.
1. Repairing Exhaust Manifold Leaks
An exhaust manifold leak constitutes one of the most critical issues, as the manifold is directly coupled to the engine and handles the extremely hot exhaust gases immediately following combustion.
Repairing this type of leak typically involves tightening loose bolts, replacing a damaged gasket, or, in more severe instances where the manifold itself has cracked, replacing the entire manifold assembly.
Because the manifold is subjected to expansion and contraction caused by extreme temperature fluctuations, even minor cracks can propagate over time and adversely affect engine performance.
Repairing this specific component requires extreme caution, as it involves exposure to very high temperatures and pressures; in many instances, replacing the gasket, or the entire manifold, proves to be the most reliable and effective solution.
2. Exhaust Pipe Leak Repair
Exhaust pipe leaks are quite common, as the pipes run beneath the vehicle and are exposed to moisture, dirt and road debris, which can lead to corrosion and deterioration over time.
Small holes or cracks in the pipes can often be repaired using repair tape, sealants, or patch kits, depending on the extent of the damage.
For larger or heavily corroded sections, replacing the damaged portion of the pipe is generally the best option.
Repairing pipe leaks helps restore proper airflow, reduce noise levels and prevent harmful gases from escaping the system before reaching the tailpipe.
3. Muffler Leak Repair
Muffler leaks primarily impact the vehicle’s noise levels, often resulting in a loud and unpleasant sound while driving.
Holes or internal defects in the muffler can be caused by corrosion, moisture accumulation, or prolonged use.
Minor leaks can be fixed using patch kits or sealants; however, if the muffler is severely deteriorated or its structural integrity has been compromised, replacement remains the most effective solution.
A properly functioning muffler dampens engine noise and enhances the driving experience; therefore, repairing leaks in this component is crucial for both vehicle performance and noise control.
4. Repairing Leaks at Joints or Connections
Leaks occurring at joints or connections are typically caused by loose clamps, worn-out gaskets, or improperly fitted components and these are often the easiest leaks to repair.
If the components are still in good condition, simply tightening the clamps or bolts may immediately resolve the leak.
If the gasket situated between the two parts has worn out, replacing it will restore the seal, thereby preventing exhaust gases from escaping.
In some instances, applying a small amount of exhaust sealant can further enhance the effectiveness of the seal.
Repairing leaks at connection points is crucial, as even minor cracks can compromise the internal pressure of the entire exhaust system and detrimentally affect its overall performance.
Know About The Temporary vs Permanent Solutions
When dealing with an exhaust leak, understanding the distinction between temporary and permanent solutions is crucial for selecting the appropriate remedy based on the severity of the problem.
Temporary solutions are typically quick and inexpensive methods designed to halt leaks for a short duration, whereas permanent solutions are engineered to fully repair the exhaust system, ensuring its long-term functionality.
The exhaust system operates under conditions of extreme heat and pressure; consequently, not all repairs offer equal durability and choosing the wrong approach can lead to recurring leaks over time and increased costs.
A minor crack or puncture can often be safely addressed, at least temporarily, using a temporary solution; however, in cases of severe damage, a permanent solution is frequently required to ensure safety, optimal performance and reduced emissions.
Understanding which type of repair is appropriate for a specific situation enables you to make better decisions and maintain your vehicle more effectively.
1. Temporary Solutions
Tapes, Sealants and Patches
Temporary solutions such as: exhaust repair tapes, sealants and patch kits, are typically used to quickly cover small holes or cracks within the exhaust system.
These products are formulated to withstand high temperatures and create a short-term seal that prevents exhaust gases from escaping.
Repair tape is wrapped around the damaged section; sealants fill small punctures and harden upon drying; and patches provide a sturdy covering for minor damage.
While these methods can reduce noise and temporarily improve performance, they lack the durability of permanent repairs and may degrade over time due to exposure to heat and vibration.
When to Use Them
Temporary solutions are best utilized when the damage is minor and does not compromise the structural integrity of the entire exhaust system.
They also prove useful when you require an immediate fix to operate the vehicle safely until proper repairs can be performed.
For instance, if you are on the road or if replacement parts are not immediately available, a temporary solution can help prevent further damage and minimize the leakage of harmful gases.
However, these solutions should not be relied upon for the long term specially if the leak worsens or begins to negatively impact engine performance.
2. Permanent Solutions
Welding
Welding is a robust and long-lasting method used to repair exhaust leaks by permanently sealing cracks or holes in metal components.
This process involves melting and fusing metal parts together, creating a solid, durable bond capable of withstanding high temperatures and pressures.
Welding is frequently applied to pipes and specific sections of the exhaust system where the damage is not extensive, yet where a repair stronger than what tape or sealants can provide is required.
When executed correctly, welding can restore the structural integrity of the component and offer a reliable, long-term solution.
Replacing the Entire Component
When a specific section of the exhaust system is severely damaged, heavily corroded, or deemed beyond repair, replacing the entire component constitutes the most effective and definitive solution.
This involves removing the damaged part such as: a pipe, muffler, or manifold, and installing a new replacement in its place.
Replacing the entire component ensures that the exhaust system is restored to its original condition, thereby maintaining proper gas flow, reducing emissions and improving overall performance.
Although this approach may be more expensive than temporary repairs, it completely eliminates the root cause of the problem, thereby obviating the need for frequent subsequent repairs.
Long-Term Reliability
Permanent solutions offer long-term reliability, as they are specifically engineered to withstand the demanding conditions of an exhaust system such as: extreme heat, high pressure and constant vibration.
Unlike temporary fixes, these solutions do not deteriorate quickly and do not require frequent maintenance.
Opting for a permanent solution ensures the continued proper functioning of the exhaust system, minimizes the risk of hazardous gas leaks and preserves both fuel efficiency and engine performance over time.
Investing in proper, long-lasting repairs often proves to be more cost-effective in the long run, as it eliminates recurring repair expenses and safeguards against potential damage to other vehicle components.
Read More:
- How to Fix a Rattling Exhaust
- How to Fix Steering Fluid Leak
- How to Fix a Stiff Steering Wheel
- How to Clean Car Steering Wheel
- How to Check Steering Rack Play
- How to Replace a Steering Rack Boot
- How to Repair a Power Steering Hose Leak
- How to Bleed Power Steering Fluid
- How to Replace Power Steering Pump
- How to Change a Car Steering Wheel
- How to Check Power Steering Fluid
Estimated Cost of Fixing an Exhaust Leak
The cost of repairing an exhaust leak depends on the severity of the damage, the location of the leak and whether you choose to fix it yourself or seek professional assistance.
An exhaust system consists of several components and the price can vary depending on whether the issue is a small hole, a loose connection, or a part that has completely failed and requires replacement.
Generally, minor leaks are less expensive to repair, whereas major issues involving the exhaust manifold or catalytic converter can incur higher costs.
Taking immediate action can significantly reduce repair expenses, as it is easier and cheaper to fix minor problems before they escalate into major damage.
Understanding the various cost-related factors helps you plan more effectively and choose the most appropriate repair option for your specific situation.
1. Cost of DIY Repair
Fixing an exhaust leak yourself is generally the most economical option, particularly for minor issues such as small holes or loose connections.
Basic repair supplies such as: exhaust tape, sealants, or patch kits, are typically inexpensive and can be applied using simple tools that many people already have at home.
The total cost of basic DIY repairs is often quite low, although this depends on the specific products used and the extent of the damage.
While DIY repairs can save money, they require proper caution and correct execution to ensure that the repair is both effective and safe.
For minor leaks, this approach can be a practical and budget-friendly solution.
2. Cost of Professional Repairs
The cost of professional repairs is higher than that of DIY repairs, as it encompasses the costs of both parts and labor; however, it offers a more reliable and long-lasting solution.
A mechanic can accurately diagnose the problem and utilize the appropriate tools and techniques to repair or replace damaged components.
Minor repairs such as: tightening connections or replacing gaskets, may incur moderate costs, whereas more extensive repairs such as: replacing a muffler, exhaust pipe, or manifold, as it can result in significantly higher expenses.
Although professional repairs require a larger financial investment, they often guarantee high-quality workmanship and minimize the likelihood of recurring issues.
3. Factors Influencing Cost
Vehicle Type
The type of vehicle plays a pivotal role in determining repair costs, as different vehicles feature distinct exhaust system designs and components.
Larger vehicles or high-performance cars may possess more complex systems requiring specialized parts, which can drive up costs.
Conversely, smaller or standard vehicles typically feature simpler systems and their replacement parts tend to be more affordable.
Severity of Damage
The extent of the damage has a direct impact on repair costs, as fixing minor leaks is generally easier and less expensive than repairing major cracks or severely deteriorated components.
Minor issues can often be resolved quickly using simple methods, whereas severe damage may necessitate the replacement of entire components, thereby increasing both parts and labor costs.
Addressing a problem at its onset can help prevent costly repairs in the future.
Labor Charges
Labor charges depend on the complexity of the repair and the time required to complete it.
Simple repairs may take less time and incur lower costs, whereas more complex tasks such as: replacing major components, require greater effort and expertise, thereby increasing the total expense.
Labor rates can also vary based on location and the mechanic’s experience, playing a significant role in the overall cost.
When You Should Visit to The Car Mechanic
While many minor leaks in an exhaust system can be fixed at home, there are certain situations where seeking professional assistance is the safest and most effective option.
Exhaust systems operate under extreme heat and pressure; therefore, repairing certain issues requires specialized tools, technical expertise and precise workmanship to prevent further damage or safety hazards.
Ignoring serious problems, or attempting complex repairs without the necessary experience, as it can lead to adverse outcomes, escalating repair costs and even dangerous situations (such as exposure to harmful gases).
Professional mechanics are trained to accurately diagnose problems and provide long-lasting solutions, a factor that is particularly critical for essential components of the exhaust system.
Knowing when to stop attempting DIY repairs and when to consult an expert can safeguard both your vehicle and your personal safety.
1. Large Cracks or Severe Corrosion
When an exhaust system develops large cracks or suffers from severe corrosion, it is typically damaged to an extent that cannot be remedied using simple methods like tape or sealants.
Extensive corrosion can degrade the metal, compromising the structural integrity of the component and significantly increasing the risk of total system failure.
Large cracks allow exhaust gases to escape in substantial quantities, negatively impacting engine performance and increasing noise levels.
In such situations, a professional mechanic can assess the extent of the damage and recommend the appropriate solution such as: welding or replacing the entire component, to ensure a safe and durable repair.
2. Issues Related to the Catalytic Converter
Problems involving the catalytic converter require professional attention, as this component plays a crucial role in reducing harmful emissions through complex chemical reactions.
If the converter becomes clogged, damaged, or develops a leak, it can lead to reduced engine performance, increased fuel consumption and the vehicle failing to meet emission standards.
Repairing or replacing a catalytic converter often requires specialized tools and expertise; if the work is not performed correctly, it can lead to even more complex issues down the line.
A professional mechanic can accurately diagnose the problem and ensure that the repairs meet all necessary environmental and performance requirements.
3. Persistent Leaks Following DIY Repairs
If a leak in the exhaust system persists even after attempting a DIY repair, it is a clear indication that the underlying issue may be far more serious than what appears on the surface.
Sometimes, a visible leak is merely a symptom of a larger problem; alternatively, the repair method employed may not be robust enough to effectively fix the damage.
If a leak is not properly repaired, it can result in persistent noise, diminished vehicle performance and even pose a safety risk.
A professional mechanic can conduct a comprehensive inspection, identify hidden issues and provide a more reliable and durable solution.
4. Lack of Proper Tools or Experience
Repairing certain components of the exhaust system can be challenging without the right tools or experience, particularly when dealing with tight spaces, rusted bolts, or intricate parts.
Attempting repairs without the proper tools can lead to mistakes, damage to parts, or even personal injury.
Professional mechanics possess the right tools and training to handle these challenges safely and effectively.
Seeking assistance in such situations ensures that repairs are executed correctly and minimizes the risk of future problems.
How to Easily & Effectively Prevent Exhaust Leaks in the Future
Preventing exhaust leaks is far easier and more cost-effective than repairing them after they have occurred.
This primarily involves proper maintenance, regular inspections and sensible driving habits.
The exhaust system is constantly exposed to extreme heat, moisture and road conditions, leading to natural wear and tear over time.
However, many common issues can be avoided through simple maintenance practices.
A well-maintained exhaust system not only lasts longer but also helps the engine run more efficiently, reduces fuel consumption and keeps harmful emissions in check.
By adopting a few basic preventive measures, you can minimize the likelihood of leaks, avoid unexpected repairs and ensure that your vehicle remains safe and reliable for the long haul.
Also, there’s study that shows that carbon monoxide is one of the primary pollutants in the vehicle exhaust and it is highly toxic even at the low concentrations, also it states that automobile exhaust contributes significantly to the overall air pollution, with a large percentage that comes from the vehicles. Plus, carbon monoxide is particularly dangerous as it is colorless and odorless that actually means that people may not relalize they are being exposed, that’s exactly the research strongly supports that the idea that exhaust leaks are not just a mechanical issue but it also a serious health risk as well.[¹]
1. Regular Inspections
Regular inspections of the exhaust system are one of the most effective ways to prevent leaks, as they help identify minor issues before they escalate into major problems.
By occasionally inspecting the underside of your vehicle, or doing so during routine servicing, you can spot early signs of rust, loose connections, or hairline cracks.
Catching these issues early allows for immediate and less costly repairs, thereby preventing further damage to other components of the system.
Consistent inspections also help maintain the vehicle’s overall performance and ensure that the exhaust system is functioning exactly as intended.
2. Avoiding Short Trips – Prevents Moisture Buildup
Taking frequent short trips can increase the risk of exhaust leaks, as it does not allow the exhaust system sufficient time to heat up enough to evaporate the moisture accumulated inside it.
When the engine is running, water vapor is generated as a byproduct of the combustion process.
If the system does not heat up sufficiently, moisture remains trapped inside the pipes.
Over time, this trapped moisture can lead to internal rust and corrosion, weakening the metal and causing leaks.
Occasionally, driving the vehicle over long distances causes the system temperature to rise significantly, allowing the moisture to evaporate and thereby reducing the likelihood of internal damage.
3. Protection Against Rust
Rust is one of the primary causes of exhaust leaks; therefore, protecting the system from corrosion is crucial.
This can be achieved by keeping the underside of the vehicle clean and free from dust, mud and road salt, particularly in regions where salt is applied to the roads during rainy or winter seasons.
In some instances, applying protective coatings or utilizing rust-resistant components can help extend the lifespan of the exhaust system.
Minimizing exposure to moisture and corrosive substances helps maintain the structural integrity of the metal, thereby preventing the formation of holes or cracks.
4. Addressing Minor Issues Promptly
Repairing minor issues as soon as they arise is the most effective method for preventing major leaks in the exhaust system in the future.
A loose clamp, a hairline crack, or early signs of rust may seem insignificant; however, if left unaddressed, they can escalate into major problems requiring more extensive and costly repairs.
Promptly fixing these minor issues ensures that proper pressure and airflow are maintained within the exhaust system, factors that are vital for the engine’s performance and efficiency.
Timely repairs not only save money but also reduce the risk of damage spreading to other components of the vehicle.
Conclusion – How to Fix Exhaust Leak
So, if there’s exhaust leak then you need to act upon very early to prevent them from major failure or safety hazards.
The exhaust system plays a pivotal role in channeling harmful gases away from the engine and passengers, while also facilitating efficient engine operation by maintaining proper pressure and airflow.
When a leak occurs, even if it initially appears minor, it can lead to reduced fuel efficiency, diminished engine power, increased emissions and a potential health risk due to exposure to toxic gases such as carbon monoxide.
Research and automotive studies clearly demonstrate that leaks can disrupt engine balance and drive up fuel consumption; this implies that ignoring this issue could result in significantly higher costs for you in the long run.
Understanding how to identify, inspect and repair exhaust leaks empowers you to maintain better control over your vehicle’s condition and avoid unnecessary expenses.
Simple measures such as: tightening loose connections or applying sealants, as it can resolve minor issues, whereas more serious problems may necessitate part replacements or professional assistance.
Selecting the appropriate repair method based on the severity and location of the leak is essential for achieving a lasting solution.
Now, that’s all from this guide and if you still have confusion: just comment down below.
Frequently Asked Questions
Q1. Can you drive with an exhaust leak?
Answer: Yes, technically you can drive with an exhaust leak, but it is not safe and should be avoided whenever possible. An exhaust leak allows harmful gases, such as carbon monoxide, to enter the vehicle’s cabin; this can have adverse effects on your health, often without you even realizing it, as the gas is colorless and odorless. It can also reduce engine performance, increase fuel consumption and cause loud noises that may worsen over time. Driving for a short distance in an emergency might be acceptable, but it is always best to have the leak repaired as soon as possible to avoid serious health risks and costly damage.
Q2. How long does it take to fix an exhaust leak?
Answer: The time required to fix an exhaust leak depends on the severity of the problem and the repair method used. Minor repairs such as: tightening loose clamps or applying sealant, as it can take less than an hour. Moderate repairs, such as applying a patch kit, may take a little longer, typically between one and two hours. However, if the damage is severe and requires replacing components like the muffler or exhaust pipe, the repair process could take several hours. In a professional workshop setting, the timeframe may also depend on the availability of parts and the complexity of the vehicle.
Q3. Is repairing an exhaust leak expensive?
Answer: The cost of repairing an exhaust leak can vary significantly depending on the size and location of the damage. Small leaks that can be fixed with tape, sealant, or minor adjustments are typically inexpensive to repair. However, major issues requiring component replacement such as: a damaged muffler or exhaust manifold, as it can be quite expensive. If you opt for professional repairs, labor charges will also be added to the total cost. Addressing the problem promptly is the best way to keep costs down, as repairing minor issues is significantly cheaper than repairing major damage.
Q4. Can an exhaust leak affect fuel economy?
Answer: Yes, an exhaust leak can reduce fuel economy because it disrupts the proper flow of exhaust gases and negatively impacts engine performance. The engine relies on a balanced air-fuel mixture to function correctly; a leak can distort oxygen sensor readings, leading to incorrect fuel adjustments. Consequently, the engine may consume more fuel than necessary. Over time, this not only increases fuel costs but also diminishes the engine’s overall efficiency; therefore, it is crucial to have any leaks repaired immediately.
Q5. How can I tell if the leak has been fixed?
Answer: To confirm that the exhaust leak has been successfully repaired, you can look for the common symptoms that were present prior to the repair. If loud noises, hissing sounds, or the smell of exhaust fumes have disappeared, it is a clear indication that the leak has been sealed. You can also perform a few simple checks, such as listening carefully while the engine is running or using the soapy water method to see if any bubbles form. A properly repaired exhaust system will run more quietly and smoothly, with no apparent gas leaks, giving you the confidence that the repair was successful.
References:
[1] The carbon monoxide levels in automobile exhaust. A case study in Chidambaram town
https://pubmed.ncbi.nlm.nih.gov/12395517/

Guys, I’m a car audio enthusiast and customization expert and I love clear sound and clean installation. Plus, I have spent years helping people build their dream audio setups. And whenever I’m working on cars, I probably listen to music and thinks about the next big upgrade.