Written By: Don Dodi
Fact Checked By: Kristen Brown
Reviewed By: Diego Rosenberg
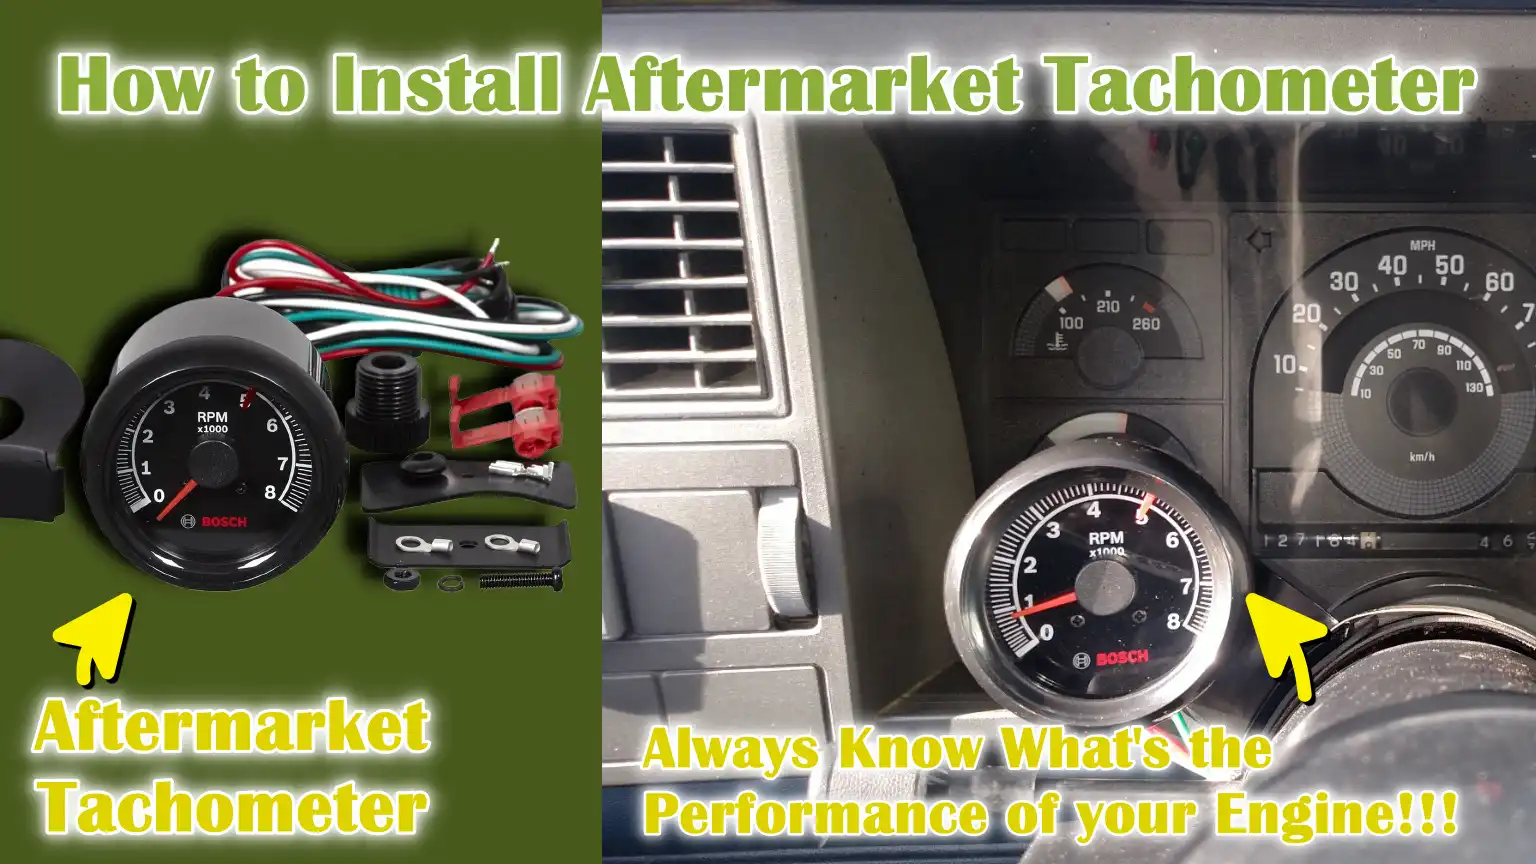
A tachometer is the device that helps you to see exactly how hard your engine is working at that moment, as it measures engine revolutions per minutes which is also known as RPM.
Now-a-days, many modern cars already comes with a factory installed tachometer, but the older vehicles and base-model cars often lack that accurate RPM monitoring.
Which is why, it is really important to have one in them; as it helps the drivers to understand the engine behavior, shift gear at the right time and it also helps drivers to prevent over-revving the vehicle, otherwise it can cause the serious engine damage as well.
Basically, tachometers work by reading the signals from the ignition coil, engine control unit or the crankshaft position sensor as well; and then it converts those signals into a clear RPM display.
So, this is the guide that shows you How to Install Aftermarket Tachometer, so that you can use them in daily driving and have the real-time engine data for smoother vehicle experience.
What are the Benefits of Installing an Aftermarket Tachometer
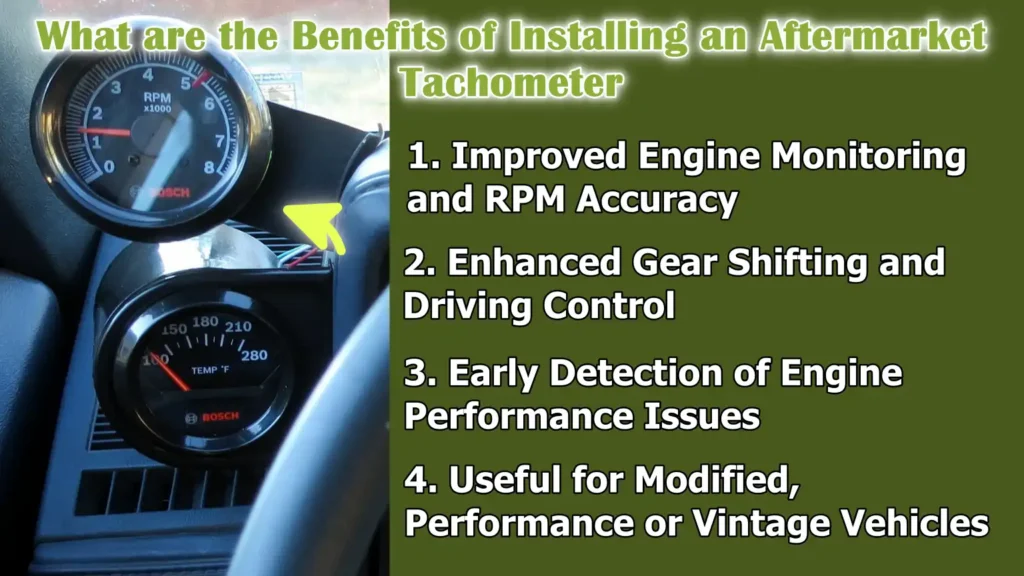
1. Improved Engine Monitoring and RPM Accuracy
An aftermarket tachometer provides a clear and accurate reading of the engine’s revolutions per minute (RPM), showing you exactly how fast the engine is running at any given time.
This information is crucial because every engine is designed to operate within a safe RPM range.
By properly monitoring the RPM, drivers can prevent the engine from over-revving or under-revving, which can reduce its lifespan.
Compared to older factory gauges or vehicles that lack a tachometer altogether, aftermarket tachometers often provide more precise and stable readings.
This accurate monitoring helps drivers understand the engine’s normal behavior during idling, acceleration and cruising, resulting in safer and more predictable driving.
2. Enhanced Gear Shifting and Driving Control
Knowing the engine RPM makes gear shifting easier and more efficient, specially in vehicles with manual transmissions.
A tachometer indicates the optimal time to shift gears, helping drivers avoid shifting too early, which can lead to poor acceleration, or shifting too late, which can strain the engine.
Proper shifting based on RPM results in smoother driving, improved throttle response and better control in both city traffic and highway driving.
Even for automatic vehicles, RPM information helps drivers understand how the transmission operates in different driving conditions, leading to more confident and controlled driving.
3. Early Detection of Engine Performance Issues
An aftermarket tachometer can help detect engine problems before they become serious.
Abnormal RPM behavior, such as an unstable idle, sudden RPM surges, or delayed response, can indicate issues like ignition problems, vacuum leaks, or sensor malfunctions.
By noticing these changes early, drivers can address minor issues before they escalate into major engine damage or costly repairs.
This early warning function makes the tachometer a valuable diagnostic tool for routine vehicle maintenance.
4. Useful for Modified, Performance or Vintage Vehicles
Aftermarket tachometers are particularly beneficial for vehicles that have been modified, are used for performance driving, or were manufactured before tachometers were commonly installed.
Engine upgrades such as turbochargers, aftermarket camshafts, or performance tuning often alter how the engine behaves at different RPM levels.
A tachometer helps drivers stay within safe limits while enjoying improved performance.
In older vehicles, an aftermarket tachometer adds modern engine monitoring without altering the original design, making it easier to drive and maintain classic or vintage cars safely.
Learn, What are the Types of Aftermarket Tachometers Available
1. Analog vs Digital Tachometers
Analog tachometers use a needle and dial to display engine RPM, making it easy for drivers to quickly see changes while driving.
They are popular because the moving needle visually shows how quickly the engine speed is increasing or decreasing, which is helpful during acceleration and gear changes.
Digital tachometers display RPM as numbers on a screen, providing very precise readings and often including extra features like shift lights or memory functions.
While analog units are simpler and easier to read at a glance, digital tachometers appeal to drivers who want precise RPM values and modern display options.
2. Tachometers for Gasoline vs Diesel Engines
Tachometers designed for gasoline engines typically receive signals from the ignition system, such as the ignition coil or ECU, as gasoline engines use spark plugs to ignite the fuel.
Diesel engines operate differently and do not use spark plugs, so diesel tachometers often rely on signals from the alternator, crankshaft sensor, or engine control module.
Using the correct tachometer for the engine type is crucial because the signal sources and RPM ranges differ.
Choosing the wrong type can result in inaccurate readings or the tachometer not working at all.
3. Single-Coil vs Multi-Coil Ignition Systems
Some older vehicles have a single ignition coil that sends signals to all cylinders, while many modern vehicles have multi-coil or coil-on-plug systems where each cylinder has its own coil.
Aftermarket tachometers must be compatible with the vehicle’s ignition setup to accurately read RPM.
Tachometers for single-coil systems are typically easier to install, while those for multi-coil systems may require ECU connections or special adapters.
Understanding the ignition system ensures stable RPM readings and prevents signal errors.
4. Universal vs Vehicle-Specific Tachometers
Universal aftermarket tachometers are designed to work with a wide range of vehicles and engine types, making them a popular and cost-effective option.
They typically include adjustable settings for different cylinder counts and signal sources.
Vehicle-specific tachometers are designed for a particular make or model and often offer easier installation and better integration with factory wiring.
While universal tachometers offer flexibility, vehicle-specific units minimize compatibility issues and, when properly installed, provide more accurate, factory-style performance.
Tools
| Tool / Material | Purpose and Easy Explanation |
|---|---|
| Aftermarket Tachometer Kit | This is the main device that displays the engine RPM. It typically includes the gauge, wiring and basic mounting hardware necessary for installation. |
| Wire Strippers and Crimping Tool | Wire strippers remove the plastic covering from wires without damaging them. Crimping tools help securely attach connectors, ensuring safe and reliable wiring. |
| Screwdrivers and Socket Set | These tools are used to remove dashboard panels and tighten or loosen bolts. They help you securely mount the tachometer in your chosen location. |
| Electrical Tape and Heat-Shrink Tubing | Electrical tape covers exposed wires to prevent short circuits. Heat-shrink tubing provides additional protection and keeps wire connections strong and neat. |
| Multimeter or Test Light | A multimeter or test light helps identify power, ground and signal wires. This ensures correct connections and prevents wiring errors. |
| Mounting Bracket or Dashboard Pod | This securely holds the tachometer in place on the dashboard or pillar. Proper mounting keeps the gauge stable and makes it easy to read while driving. |
How to Ensure Safety Before Installation of Aftermarket Tachometer
1. Disconnecting the Vehicle Battery
Before beginning the installation of an aftermarket tachometer, one of the most crucial safety steps is disconnecting the vehicle’s battery.
Removing the negative battery terminal cuts off electrical power and helps prevent short circuits, accidental sparks and damage to sensitive electronic components.
This step also reduces the risk of electric shock when handling exposed wires.
Many modern vehicles have complex electrical systems and even a minor wiring mistake with the battery connected can damage fuses, sensors, or control modules.
Disconnecting the battery creates a safe working environment and protects both the vehicle and the installer.
2. Working in a Well-Lit and Ventilated Area
Installing a tachometer often involves working under the dashboard and around engine components, where visibility can be limited.
A well-lit area allows you to clearly see wire colors, connection points and mounting areas, reducing the likelihood of incorrect wiring.
Proper ventilation is equally important, specially when working in a garage, as engine fumes, dust, or electrical odors can quickly accumulate.
Good lighting and fresh air improve focus, reduce fatigue and make the entire installation process safer and more comfortable.
3. Avoiding Airbag and Steering Column Wiring
Modern vehicles contain airbag systems and steering column wiring that should not be tampered with.
Airbag wires are typically marked with bright colors and are designed to deploy the airbags in the event of a collision.
Accidentally cutting or tapping into these wires can trigger warning lights or create serious safety hazards.
The steering column also contains essential wiring for controls such as turn signals and ignition.
Keeping the tachometer wiring away from these areas prevents accidental damage and ensures that essential safety systems continue to function correctly.
4. Reading the Tachometer Manufacturer’s Instructions
Every aftermarket tachometer is designed slightly differently and the manufacturer’s instructions provide crucial information about wiring, settings and compatibility.
Reading these instructions before you begin helps you understand where each wire should connect and how to configure the tachometer for your specific engine type.
This step minimizes installation errors and prevents damage caused by incorrect connections.
Following the provided guidelines ensures that the tachometer operates correctly and safely after installation, providing reliable RPM readings from the first use.
How to Choose the Right Mounting Location
1. Dashboard Mounting Option
The dashboard is one of the most common and practical locations for mounting an aftermarket tachometer.
It provides a stable surface and places the gauge within the driver’s natural line of sight.
Many drivers choose the top of the dashboard or any available flat surface where the tachometer can be securely mounted without requiring extensive drilling into critical components.
A well-chosen dashboard location makes the tachometer easy to read while driving and minimizes distractions, specially at higher speeds or during gear changes.
2. A-Pillar or Steering Column Mounting
Mounting the tachometer on the A-pillar or near the steering column is another popular option, particularly in performance vehicles.
These locations allow the driver to check engine RPM with just a glance, keeping their attention focused on the road.
A-pillar mounts are often preferred because they are closer to eye level, while steering column mounts rotate with the wheel and remain centered in front of the driver.
Proper placement in these locations should avoid obstructing airbags or steering movement to maintain safety.
3. Ensuring Clear Visibility While Driving
Clear visibility is crucial when choosing where to mount the tachometer.
The gauge should be easily readable both day and night, without forcing the driver to take their eyes off the road for extended periods.
Positioning the tachometer at a comfortable height and angle reduces eye strain and improves focus on driving.
A clearly visible tachometer allows for quick RPM checks, which is specially helpful during acceleration, shifting, or towing.
4. Avoiding Obstruction of Factory Gauges
When installing an aftermarket tachometer, it’s essential to avoid blocking factory gauges or warning lights.
The speedometer, fuel gauge and warning indicators provide critical information necessary for safe driving.
A tachometer mounted in the wrong location can obscure other displays and increase the risk of missing important alerts.
Choosing a mounting location that complements the existing dashboard layout ensures that all gauges are visible and allows the driver to monitor vehicle status without obstruction.
Now, Let’s Understand Tachometer Wiring
1. Power – 12V Ignition-Switched Source
The power wire supplies electricity to the tachometer, allowing it to turn on and function.
This wire must be connected to a 12-volt ignition-switched source, meaning the tachometer only receives power when the ignition is in the ON or RUN position.
Using an ignition-switched source prevents the tachometer from remaining on when the engine is off, thus preventing battery drain.
Common connection points include the fuse box or ignition wiring and using the correct power source ensures stable and reliable tachometer operation.
2. Ground Connection
The ground wire completes the electrical circuit and allows the tachometer to function correctly.
It should be connected to a clean, solid metal part of the vehicle’s body or chassis.
A poor ground connection can result in inaccurate RPM readings, display flickering, or the tachometer not working at all.
A tight and corrosion-free ground point ensures accurate readings and prevents electrical problems while driving.
3. Signal Wire – Coil, ECU or Tachometer Output
The signal wire is the most crucial connection as it transmits engine speed information to the tachometer.
This wire is typically connected to the ignition coil, engine control unit (ECU), or a dedicated tachometer output wire.
The signal represents the engine firing pulses, which the tachometer converts into an RPM reading.
Connecting the signal wire to the correct source is essential for accurate RPM display, as an incorrect signal can lead to erratic or inaccurate readings.
4. Illumination or Backlight Wiring
The illumination wire controls the tachometer’s backlight, providing visibility at night.
This wire is usually connected to the vehicle’s dashboard lighting circuit so that the tachometer illuminates when the headlights are turned on.
Proper illumination wiring ensures that the brightness matches factory specifications and does not distract the driver.
Correct backlight connections improve visibility and make driving at night safer and more comfortable.
How to Install Aftermarket Tachometer – Easy Method
Let’s Install the Tachometer
1. Mounting the Bracket or Pod
The first step in installing an aftermarket tachometer is mounting the bracket or dashboard pod in the chosen location.
The bracket should be securely attached to a stable surface that will not vibrate while driving.
Most tachometer kits include screws or adhesive mounts designed to securely hold the gauge without damaging the dashboard.
Proper alignment is crucial at this stage to ensure the tachometer is facing directly towards the driver and is easy to read under normal driving conditions.
2. Securing the Tachometer Firmly
Once the bracket or pod is in place, the tachometer should be firmly secured.
A securely mounted tachometer prevents inaccurate readings caused by vibrations, rattling and movement.
Ensuring the gauge is locked into the mount also improves durability, specially when driving on rough roads.
A stable installation keeps the tachometer in the correct viewing position and helps maintain its reliability over time.
How to Connect the Power Wire
1. Locating the Ignition-Switched Power Source
The power wire must be connected to a 12-volt ignition-switched power source so that the tachometer only operates when the vehicle is running.
This type of power source is typically found in the fuse box or ignition wiring.
Using an ignition-switched connection prevents the tachometer from draining the battery when the vehicle is parked.
Verifying the power source with a test light or multimeter ensures that the connection is correct and secure.
2. Properly Splicing or Tapping the Wire
Once the correct power wire is located, the tachometer’s power wire should be carefully spliced or tapped into it.
A clean and secure connection helps prevent voltage drops and electrical problems.
Using the correct connectors and insulating the joint protects the wiring from vibration and wear.
Proper splicing ensures a consistent power supply and reliable tachometer performance.
How to Perform Grounding the Tachometer
1. Choosing a Clean Metal Grounding Point
The ground wire must be connected to a clean, unpainted metal surface on the vehicle’s body or chassis.
Common grounding points include factory grounding bolts or bare metal behind the dashboard.
Paint, rust, or dirt can interfere with the grounding and lead to inaccurate readings.
Choosing the correct grounding location ensures a complete electrical circuit.
2. Ensuring a Secure and Corrosion-Free Connection
A secure ground connection is essential for proper tachometer operation.
The ground wire should be firmly attached and protected from moisture to prevent corrosion.
Poor grounding can cause flickering in the display or unstable RPM readings.
A secure and clean ground helps maintain consistent performance over time.
How to Connect the Signal Wire
1. Connecting to the Ignition Coil or ECU
The signal wire connects the tachometer to the engine’s RPM signal source, which is typically the ignition coil or the engine control unit (ECU).
This signal represents the engine firing pulses, which the tachometer converts into an RPM reading.
Choosing the correct connection point is crucial for accuracy.
An incorrect signal connection will result in the tachometer malfunctioning or not working at all.
2. Selecting the Correct Signal Terminal
Different vehicles provide the RPM signal through specific terminals or dedicated tachometer output wires.
The correct terminal must match the tachometer’s design and the engine configuration.
Checking the vehicle’s wiring diagram or manufacturer’s instructions ensures compatibility.
Selecting the correct terminal provides stable and accurate RPM readings.
3. Considering Engine-Specific Signals
Engines with different cylinder counts or ignition systems may require specific tachometer settings or adapters.
Some modern engines use digital signals, while older engines rely on analog coil signals.
Adjusting the tachometer for the correct engine type prevents inaccurate RPM displays.
Understanding these differences ensures the tachometer functions as intended.
How to Illumination Wiring – Optional But Useful
1. Connecting to the Dash Light Circuit
The illumination wire lights up the tachometer when the vehicle’s headlights or parking lights are turned on.
This wire is typically connected to the dashboard lighting circuit.
A proper connection ensures the tachometer is visible at night without being excessively bright.
Correct illumination wiring improves driving safety at night.
2. Matching Brightness with Factory Gauges
Matching the tachometer’s brightness to the factory gauges maintains a consistent look for the dashboard.
Many tachometers offer brightness adjustment or dimming features.
The correct brightness prevents glare and eye strain while driving at night.
A well-matched display makes the tachometer easy to read and looks aesthetically pleasing with the rest of the dashboard.
How to Configure the Tachometer Settings
1. Setting the Cylinder Count – 4, 6 or 8-cylinder engines
After installation, the tachometer must be set to match the number of engine cylinders so it can accurately calculate RPM.
Engines fire a specific number of times per revolution based on their cylinder count and the tachometer uses this information to display accurate readings.
Most aftermarket tachometers have a switch, dial, or menu option to select between 4-cylinder, 6-cylinder, or 8-cylinder engines.
If the cylinder setting is incorrect, the RPM display may show readings that are too high or too low.
Selecting the correct cylinder count ensures the tachometer displays the engine’s true speed during idle, acceleration and cruising.
2. Calibrating the RPM Reading
Calibration helps fine-tune the tachometer so its RPM reading matches the engine’s actual speed.
Some tachometers calibrate automatically once the correct settings are applied, while others may require manual adjustment.
Comparing the tachometer reading to a known reference, such as a factory gauge or a diagnostic scan tool, helps confirm accuracy.
Proper calibration ensures smooth needle movement or stable digital readings and prevents confusion caused by fluctuating or inaccurate RPM values.
Accurate calibration makes the tachometer a reliable tool for everyday driving and performance monitoring.
3. Verifying Vehicle Compatibility
Verifying compatibility ensures the tachometer works correctly with the vehicle’s ignition and engine control systems.
Different vehicles use different signal types, such as analog coil signals or digital ECU outputs.
Performing a compatibility check ensures that the tachometer can read the engine signal without any interruptions or data loss.
This step also verifies that the tachometer is compatible with the vehicle’s engine type and electrical system.
Proper compatibility verification prevents inaccurate readings and ensures the long-term reliability of the tachometer.
How to Do Testing of Tachometer
1. Reconnecting the Battery
After all wiring and settings are complete, the vehicle’s battery must be reconnected to restore power.
Reconnecting the negative battery terminal allows the electrical system to function normally and provides power to the newly installed tachometer.
This step should be performed carefully to avoid loose connections or sparking.
Once the battery is connected, the tachometer should power on when the ignition is turned to the ON position, indicating that the power and ground connections are working correctly.
2. Starting the Engine and Checking RPM Response
With the battery connected, start the engine and observe the tachometer’s response.
Upon starting, the tachometer should gradually rise from zero to the engine’s idle RPM.
This immediate response confirms that the signal wire is properly connected and the tachometer is receiving engine speed data.
A stable reading upon startup indicates that the wiring and settings are functioning as expected.
3. Verifying Accuracy at Idle and Higher RPMs
To ensure accuracy, check the tachometer readings at engine idle and during gradual acceleration.
Most engines idle within a specific RPM range and the tachometer should display a stable value within that range.
As the engine speed gradually increases, the RPM reading should increase smoothly without any sudden jumps.
Consistent readings at different engine speeds indicate that the calibration and cylinder settings are correct.
4. Checking for Flickering or Inaccurate Readings
During testing, it’s crucial to watch for a flickering display, erratic needle movement, or seemingly inaccurate RPM values.
These issues often point to loose wiring, poor grounding, or incorrect signal connections.
Identifying and addressing these problems early can prevent long-term reliability issues.
A smooth and stable RPM display confirms that the tachometer is installed correctly and ready for regular use.
Read More:
How to Solve Common Problems After Installation of Aftermarket Tachometer
1. Tachometer Not Working
If the tachometer doesn’t power on or display RPM readings, the problem is usually related to the power or ground connection.
A lack of an ignition-switched power source or a loose ground wire can cause the tachometer to stop working.
Checking the fuse, power wire and battery connections often resolves this issue.
Ensuring the tachometer receives power only when the ignition is on helps confirm the electrical setup is correct.
2. Incorrect RPM Readings
Inaccurate RPM readings often occur when the number of cylinders or the signal source is incorrectly set.
If the tachometer is configured for the wrong number of cylinders, it may display excessively high or low RPM values.
Checking the cylinder setting and ensuring the signal wire is connected to the correct source helps restore accuracy.
Proper calibration is essential for reliable RPM monitoring.
3. Fluctuating Needle or Unstable Display
A fluctuating needle or unstable digital display typically indicates a weak or inconsistent signal.
This can be caused by loose connections, electrical interference, or poor grounding.
Tightening connections and keeping signal wires away from high-voltage components can reduce interference.
A stable signal allows the tachometer to display smooth and consistent RPM readings.
4. Wiring and Grounding Issues
Wiring and grounding problems are common causes of tachometer malfunctions.
Open wires, poor insulation, or corroded ground points can disrupt electrical flow.
Inspecting all connections and ensuring wires are properly secured improves reliability.
A clean and secure wiring setup ensures accurate readings and long-lasting tachometer performance.
Now, Let’s Perform Final Inspection and Cleanup
1. Securing All Wiring
After the tachometer has been tested and confirmed to be working correctly, all wiring should be neatly and securely routed.
Loose or dangling wires can rub against sharp edges, moving parts, or hot surfaces, leading to damage over time.
Routing the wires along existing harnesses and securing them with ties ensures that the electrical connections remain safe and protected.
Proper wire management enhances safety, reduces noise and ensures the long-term reliability of the tachometer installation.
2. Reinstalling Trim Panels
Once the wiring is secured, the dashboard or interior trim panels that were removed during installation should be carefully reinstalled.
The panels should fit snugly into place without pinching or bending any wires.
Properly reinstalling the trim restores the interior’s appearance and protects the wiring from dust and accidental contact.
This step also ensures that there are no obstructions to the steering, pedals, or other controls.
3. Ensuring No Loose Connections
Before completing the installation, all electrical connections should be checked one last time.
Loose connections can cause intermittent power loss, inaccurate RPM readings, or flickering displays.
Gently tugging on each wire helps confirm that the connections are tight and secure.
Ensuring everything is firmly connected provides confidence that the tachometer will function correctly during everyday driving.
How to Maintain the Aftermarket Tachometer and Some Usage Tips
Plus, there’s scientific research into the magnetoelectric composite tachometers that shows that the high-precision RPM measurements remains achievable even in the extreme temperatures environments, that shows that the importance of having the accurate engine speed monitoring for vehicle that can operates under the diverse conditions; so that you can have really stable measurement that can contributes to the engine performance and longevity.[¹]
1. Periodic Wiring Inspection
Regular inspection of the tachometer’s wiring ensures long-term reliability and safe operation.
Over time, vehicle vibrations, heat and movement can cause connections to loosen or wire insulation to degrade.
Checking for any signs of damage, fraying, or looseness in the wiring allows for minor issues to be addressed before they lead to inaccurate RPM readings or electrical failures.
Periodic inspections help maintain consistent performance and prevent unexpected problems while driving.
2. Keeping Connections Clean
Clean electrical connections are crucial for accurate tachometer readings.
Dirt, dust, moisture, or corrosion can disrupt electrical flow and cause erratic or incorrect RPM displays.
Gently cleaning the connections and keeping them dry helps maintain strong electrical contact.
Clean connections minimize signal interference and ensure the tachometer continues to provide reliable engine speed information.
3. When to Recalibrate or Replace the Tachometer
Recalibration may be necessary if the tachometer begins displaying inaccurate RPM readings or after engine modifications, such as changes to ignition components or tuning.
Adjusting the settings ensures the tachometer is calibrated to match the engine’s current configuration.
If the tachometer stops working, consistently displays errors, or has physical damage, replacement may be necessary.
Knowing when to recalibrate or replace the tachometer helps maintain accurate engine monitoring and confidence while driving.
Conclusion – How to Install Aftermarket Tachometer
When you actually have the accurate RPM monitoring then you can understand the real behavior of your vehicle’s engine, that leads to the better control, better timing and it protects the engine as well.
Also, by accurately displaying the engine’s RPM (revolutions per minute), a tachometer helps drivers operate the engine within safe limits, reducing unnecessary stress on internal components and extending engine life.
As well as, during the installation process, attention to mounting location, proper wiring, correct grounding and proper configuration ensures that the tachometer provides reliable and stable readings.
Now, that’s all from this guide and you can ask questions and queries in the comment box below.
Frequently Asked Questions
Q1. What is an aftermarket tachometer and why should I install one?
Answer: An aftermarket tachometer is a gauge that displays the engine’s rotational speed in revolutions per minute (RPM), indicating how fast the engine is running. Many older cars and some base-model vehicles do not come with a factory-installed tachometer and some factory units are not very accurate. Installing an aftermarket tachometer helps drivers determine the optimal time to shift gears, prevent engine over-revving and better understand engine behavior. This is specially useful for vehicles with manual transmissions, performance cars and older vehicles.
Q2. Is it safe to install an aftermarket tachometer myself?
Answer: Yes, installing an aftermarket tachometer is generally safe for most car owners if basic safety precautions are followed. Disconnecting the battery, avoiding airbag wiring and carefully following the manufacturer’s instructions significantly reduce the risks. The installation typically involves basic wiring and mounting, which does not require advanced mechanical skills. Taking your time and working carefully makes the process safe and easy, even for first-time installers.
Q3. Where should I mount an aftermarket tachometer?
Answer: The tachometer should be mounted in a location where it can be easily viewed without taking your eyes off the road. Common locations include the dashboard, A-pillar, or steering column area. The mounting location should not obstruct factory gauges, warning lights, or the driver’s view of the road. A good mounting position enhances safety, readability and driving comfort.
Q4. What wires are needed to install an aftermarket tachometer?
Answer: Most aftermarket tachometers require four main connections: power, ground, signal and illumination. The power wire connects to an ignition-switched 12-volt source so the tachometer only turns on when the engine is running. The ground wire connects to a clean metal part of the vehicle. The signal wire connects to the ignition coil, ECU, or tachometer output to read engine speed. The illumination wire allows the tachometer to light up with the dashboard lights.
Q5. How do I find the correct RPM signal wire?
Answer: The RPM signal wire is typically found at the ignition coil, engine control unit, or, if available, the factory tachometer output wire. The exact location depends on the vehicle’s engine and ignition system. Consulting the vehicle’s wiring diagram or the tachometer manual will help identify the correct signal source. Connecting to the wrong wire can result in inaccurate readings or no display at all, so correct identification is crucial.
Q6. Do I need to set the cylinder count on the tachometer?
Answer: Yes, setting the correct cylinder count is essential for accurate RPM readings. Engines with different numbers of cylinders fire at different rates and the tachometer uses this information to calculate engine speed. Most aftermarket tachometers allow you to select 4-cylinder, 6-cylinder, or 8-cylinder settings. If this setting is incorrect, the tachometer may display excessively high or low RPM values.
Q7. Do aftermarket tachometers work in modern cars?
Answer: Yes, many aftermarket tachometers are compatible with modern cars, but compatibility depends on the engine and ignition system. Modern cars often use ECU-based or digital RPM signals instead of traditional ignition coils. Choosing a tachometer designed for modern engines or using the correct adapter ensures proper operation. Always check compatibility before installation.
References:
[1] Wide-Temperature-Range Tachometer Based on a Magnetoelectric Composite
https://www.mdpi.com/1424-8220/25/3/829

Guys, I’m a car audio enthusiast and customization expert and I love clear sound and clean installation. Plus, I have spent years helping people build their dream audio setups. And whenever I’m working on cars, I probably listen to music and thinks about the next big upgrade.